Okay, I know I've only been blogging for a year and 3 months or so, and I've already gone on two or three hiatuses. That seems like a lot of breaks in such a short amount of time, I know. Most of those hiatuses (except for the one that I took this time last year, which was because I was on vacation for 9 days) have been because I burned out a little; keeping up with a regular schedule of doing my nails and blogging got too exhausting and I needed a break. But this time, I'm taking a break to avoid the burnout, and to make sure I'm only blogging when it's because I want to, not because I need to.
As you may know if you follow me on Facebook, I've started a crochet business. I started out selling to family and friends via a Facebook group, but I'm actually working on opening up a big-girl shop on Big Cartel! I absolutely adore crocheting, and I'm super excited to be able to make money off of such an enjoyable hobby. In the last week, I got four orders from friends - plus I've been neglecting a fifth order for my aunt, which she placed months ago. On top of that, I want to make a Christmas-themed table runner, which I'm hoping to finish before my boyfriend's parents fly in from China in mid-December. And, even though I was super productive and finished making ALL of the Christmas (and Christmastime birthday) presents for my family in Michigan, I still have three gifts to make for the people I'll be spending Christmas with. To be honest, with all of that on my to-do list, I'm a little scared to open up my shop before Christmas! I'm afraid that I simply won't have the time to make anything for anyone else in time, and I certainly don't want to start out my business with frustrated, giftless customers.
So, as you can see, I have a TON of crocheting to do. Some of it has a pre-Christmas deadline, which is fast approaching. With all of that going on, plus my normal life like looking for a full-time job and doing chores and not neglecting my boyfriend, and family staying with us for the entire second half of December, I fear that trying to keep up with blogging will absolutely break me. So in order to prevent that from happening, in order to remember that I do my nails and blog because I like to, I'm going to put a hold on the blog for a few weeks. I might do one or two posts in the coming weeks - I was hoping to do at least one Christmas nail art design like I did last year! - but I almost definitely won't be posting once a week. I might end up skipping December's Do I Need Them All post as well. We'll see.
As with my previous blogging breaks, I'll probably still be active on my various social media accounts! Since Twitter and Instagram are also my personal accounts, you might get to see some of my crochet updates and pics of holiday celebrations. And at the very least, I'll be around on Facebook to keep you in the loop for awesome nail polish sales and giveaways!
I just wanted to let you all know what's going on, because I know how sad it can be when a blogger just stops posting. I will be back some time in January, I'm sure. Hopefully I'll be able to stick to the same schedule that I've been doing since summer!
I want to wish you all Happy Holidays. Whether you celebrate any of them or not, I hope that the next month is filled with joy, happiness, and love.
PS If you're interested in seeing what I crochet, feel free to visit (or join!) my Facebook group. And check out my shop, http://katescrochets.bigcartel.com/! It's now open and I'm even running a giveaway!
December 5, 2015
December 2, 2015
Christmas Crafting: Nail Polish Ornaments
Got any nail polishes that you love the look of but never wear and don't want to get rid of? Do you own any Mentality nail polish that you don't feel safe wearing? Or are you like me, and have a ton of polish and want to actually use some of it up? Then I've got a craft that I think you'll enjoy!

I got this idea from Elizabeth of My World Sparkles Lacquers. At first I was a little weary to dump out significant amounts of polish at a time, but then I was like "oh please, look at how many bottles of nail polish you have! Do iiiit." So I bought a 12-pack of small glass ornaments from JoAnn Fabrics (I assume you can find these at most craft stores and pretty much anywhere with a good selection of ornaments) and decked them out!

I got this idea from Elizabeth of My World Sparkles Lacquers. At first I was a little weary to dump out significant amounts of polish at a time, but then I was like "oh please, look at how many bottles of nail polish you have! Do iiiit." So I bought a 12-pack of small glass ornaments from JoAnn Fabrics (I assume you can find these at most craft stores and pretty much anywhere with a good selection of ornaments) and decked them out!
Elizabeth used much bigger ornaments, so she set hers up on top of open mason jars while they dried. Since the ornaments that I bought are so small (probably about 1.5" in diameter), I propped mine up on top of opened lotion bottles and their caps.

The process was simple, though a bit lengthy:

The process was simple, though a bit lengthy:
1. Pour polish into bulb
2. Swirl polish around, coating entire interior
3. Pour out immediate excess (back into polish bottle - no need to waste yet!)
4. Set ornament tilted downwards, so that no polish will drip out, and allow excess to gather
5. Pour out excess polish (at this point, it's probably thickened enough that you won't want to put it back into the bottle. I laid out paper towels and newspaper.)
6. Set ornament upright
7. Repeat steps 4-5 if necessary
8. Set ornament upside down and allow to drip out. (Keep an eye on it, though - I let too much polish drip out of one of them and it ended up less opaque than I wanted it!) Elizabeth put paper towels into her mason jars for this step, but I didn't really want to clean out all of my lotion bottles. What I ended up doing was only dripping out one ornament at a time into an empty water bottle.
9. Add a second coat if necessary, and repeat steps 1-8 (but don't pour the excess back into the bottle in step 3 if you're using a different color!)
When layering different polishes in these, be sure to do it in the opposite order of painting your nails! Apply glitters/toppers first, then the base color.
When layering different polishes in these, be sure to do it in the opposite order of painting your nails! Apply glitters/toppers first, then the base color.
Since I was doing so many of these, I usually started the next ornament after step 3 of the previous one. It was so much fun! My dining room was filled with lots of odd scents between the opened lotion bottles and all of the nail polish! Not exactly the smell I'm used to when decorating for Christmas. :)
Here's a video tutorial of my process:
I'm so excited to hang these on our tree this year! Since we don't have a tree yet (it's in the mail!), I used a bobby pin and my regular light box to take photos of my lovely new ornaments. Pretty crafty, eh?
Here's a video tutorial of my process:
I'm so excited to hang these on our tree this year! Since we don't have a tree yet (it's in the mail!), I used a bobby pin and my regular light box to take photos of my lovely new ornaments. Pretty crafty, eh?

I actually bought Twilight Twinkles specifically for this craft! I'd hoped that I would use most of it up, but there's still plenty left. These small ornaments probably only use about 1/4-1/3 of a full-sized bottle of polish. If you really want to use up a whole bottle of polish, either get bigger ornaments or do multiple ornaments in the same color!

I was hesitant to use Twisted Colors polishes in these ornaments, because sadly Twisted Colors has closed their shop, possibly forever. But the three Christmas polishes that I got last year are just so perfect for these that I decided to sacrifice some future manis.


I considered adding a white background to this one, but I rather like it clear! Hopefully I can place it strategically in front of a light bulb on the tree so the light can sparkle through.


Ellagee Jeweled Egg Hunt
Okay, I'm going to need to swatch this one soon. It's amAzing. All that density is in only two coats! I'm sure that on the nail, one coat would be almost completely opaque.


Wet n Wild Rockin' Rubies and Sally Hansen CSM Red My Lips
Youch, my phone really messed this one up. It's nowhere near this neon red in person - and it's actually quite sparkly! But cameras hate the color red, as I've learned quite well over the past year.

Twisted Colors All Spruced Up and Spoiled by Wet n Wild Green to be Heard
I mean, how could I NOT use this one for an ornament?! It's so perfect!


Wet n Wild Back Alley Deals and Sally Hansen CSM Blue My Mind
This is the one that I accidentally let too much polish drip out of. Oops! I still like it.


Wet n Wild Diamond in the Rough and Hi Ho Silver
The Wet n Wild polish is actually pretty black, but even two coats of it was super sheer in the ornament. I chose to use a silver background because I figured black would be a bit too dark for a Christmas ornament! (As in, literally too dark. Not that I think black is too depressing or whatever.)


Twisted Colors Star of Wonder and Essie Style Cartel
Unghhh. So pretty! It's much darker and more sparkly in person, but as always, dark colors + camera = bleh.

Jior Couture Means a Little Bit More and
Creative Cuticles Nail Polish Please Have Snow and Mistletoe
I couldn't decide which of these glitters I'd prefer to use, so I mixed them! I really like the glitter ornaments that I didn't add a background color to. They look like snowglobes!

Wet n Wild 24 Carats
The little flakes don't show up so well in this shot, but this polish has some gorgeous red flakies in it! It's super gorgeous and very Christmasy.
Have you ever done anything like this? What are your favorite Christmas/holiday decorations? Let me know in the comments!
Have you ever done anything like this? What are your favorite Christmas/holiday decorations? Let me know in the comments!
November 25, 2015
KB Shimmer: Pigment of My Imagination
This is my first KB Shimmer nail polish purchase, and I couldn't have chosen a better polish to start with!
I've never owned a true multichrome polish like this one. I seem to recall a weird rose-gold-to-snot-green shift that my Mom had when I was a kid, but the awkward green shift rendered it pretty much unwearable. I guess multichrome technology has gotten better since then - either that, or the color shift effects just work better when the different colors blend together well!
I almost have to wear gloves when I drive with this polish on. It is so hard to take my eyes off of!

The main color in Pigment of My Imagination is purple, but boy oh boy does it shift around.

Above you can see it has a reddish shift at this angle, and next up it becomes a bit more goldish-red-purple:
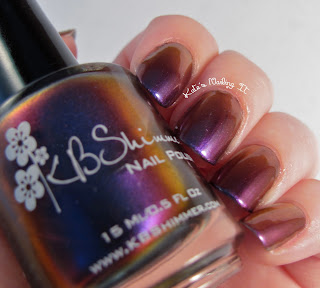
See that streak of very very gold near the edges of the bottle? Usually a shift like that doesn't show up on my camera. But this one absolutely does!

WHAT. HOW IS THIS THE SAME POLISH. I promise I didn't get my photos mixed up! This incredible red-copper color is indeed still Pigment of My Imagination. The first three photos were taken under my yellowish lamps and inside my light box (which softens the light and helps reduce glare.) The photo above is directly under the same lamp, without the light box. I found that the more direct the light, the more pronounced the colorshift is.

Direct sunlight makes Pigment of My Imagination lean more blue-purple. But indirect sunlight...

... makes the color lean more towards that reddish-coppery tone, though it's still very purple at the right angle.

This one was taken in the whitest light I have - my bathroom, haha. In whiter light, this polish continues to lean towards the blue end of the purple spectrum, still with a flash of the coppery tones.

I swear, this polish is at least half magic potion! This is another picture taken under my yellowish lamps, without the soft box. It's a completely new shade of purple that we haven't really seen in the other pictures! I seriously couldn't stop taking pictures of this polish. It just shifts so much! I love it!
Formula-wise, Pigment of My Imagination is quite lovely. It's thin, but not watery. The first coat is pretty sheer, but the second coat makes it perfectly opaque.
Although I think my pictures have captured at least most of the different colors in this polish, I think a video does it much better! Feast your eyes (or click here to watch the video on YouTube):
What do you think of this polish? Do you own any multichromes? Did you own any of the unfortunate snot-green multichromes of the late 90s/early 2000s? Let me know in the comments!
By the way - Happy Thanksgiving weekend to my American followers! My birthday is on Thanksgiving this year so I'm going to have an amazing weekend :D What are you doing for the holiday weekend? Let me know in the comments!
November 21, 2015
Do I Need Them All? Zoya, Nails Inc London, and China Glaze nudes
Welcome to November's edition of Do I Need Them All! This month, we'll be taking a look at four nude nail polishes.

From left to right, we have: Zoya Ana, Zoya Chantal, Nails Inc London Radnor Walk, and China Glaze Sunset Sail. I have the polishes in the same order on my nails in the photos below.

These polishes are pretty surprisingly different once you get them on the nail! Ana is a Satin finish - somewhere between glossy and matte - which comes as no surprise since that's right on the bottle. Radnor Walk actually dries to a matte finish, which is a bit of a surprise since it's not written on the bottle at all. And Sunset Sail has a bit of a shimmer to it, but its shimmer is much more subtle than that of Radnor Walk.

Colorwise, these polishes kind of pair up: Sunset Sail is almost the same shade as Chantal, though SS leans perhaps a touch more peachy; and Ana and Radnor Walk are very similar shades, though the pinkish sparkle in RW does make it look a bit pinker overall.

I found that using flash was the best way to show the differences in finish - and to actually show off the shimmers in Radnor Walk and Sunset Sail. My camera wasn't really picking up the shimmers at all - and the flash on my camera is ridiculously bright at its lowest setting, so I took this picture on my phone.
These colors are altogether much more different on the nail than they are in the bottle! There are definitely no dupes here.
So, Do I Need Them All? Sure! These babies are definitely all different from each other. The sparkles in two of them, the matte and satin finishes, and the two different main color tones make them very different nail polishes. Until I really got in to collecting nail polish, I probably would have picked only one of these four, because I wasn't really in to nude polish. Which one, I'm not sure, but I use to wear nude colors so rarely that I didn't care to own similar shades! However, for someone who loves doing nail art but works a job where nail polish can't be too colorful, I would say that you definitely need all of these! Just be sure to grab a Satin and a matte top coat if you want to secure your manicure and retain the different finishes featured in this post.
Was this post helpful to you? Are there any specific polishes that you'd like to see compared in this series? Let me know in the comments!

From left to right, we have: Zoya Ana, Zoya Chantal, Nails Inc London Radnor Walk, and China Glaze Sunset Sail. I have the polishes in the same order on my nails in the photos below.

These polishes are pretty surprisingly different once you get them on the nail! Ana is a Satin finish - somewhere between glossy and matte - which comes as no surprise since that's right on the bottle. Radnor Walk actually dries to a matte finish, which is a bit of a surprise since it's not written on the bottle at all. And Sunset Sail has a bit of a shimmer to it, but its shimmer is much more subtle than that of Radnor Walk.

Angled more towards the light to purposefully get a glare - to demonstrate the different finishes.
Colorwise, these polishes kind of pair up: Sunset Sail is almost the same shade as Chantal, though SS leans perhaps a touch more peachy; and Ana and Radnor Walk are very similar shades, though the pinkish sparkle in RW does make it look a bit pinker overall.

I found that using flash was the best way to show the differences in finish - and to actually show off the shimmers in Radnor Walk and Sunset Sail. My camera wasn't really picking up the shimmers at all - and the flash on my camera is ridiculously bright at its lowest setting, so I took this picture on my phone.
These colors are altogether much more different on the nail than they are in the bottle! There are definitely no dupes here.
So, Do I Need Them All? Sure! These babies are definitely all different from each other. The sparkles in two of them, the matte and satin finishes, and the two different main color tones make them very different nail polishes. Until I really got in to collecting nail polish, I probably would have picked only one of these four, because I wasn't really in to nude polish. Which one, I'm not sure, but I use to wear nude colors so rarely that I didn't care to own similar shades! However, for someone who loves doing nail art but works a job where nail polish can't be too colorful, I would say that you definitely need all of these! Just be sure to grab a Satin and a matte top coat if you want to secure your manicure and retain the different finishes featured in this post.
Was this post helpful to you? Are there any specific polishes that you'd like to see compared in this series? Let me know in the comments!
November 18, 2015
Happy Movember!
November has been lovingly known as Movember for a few years now, thanks to the "No-Shave November" trend. (Is it a trend? a lifestyle? a challenge? I honestly don't know at this point.) So I decided to do a quick and easy Jamberry manicure to celebrate!

I mixed things up because I have a TON of sample sheets of different wraps - my Jamberry representative loves sending out samples to her customers! So I had a lot of fun with the accent nails.

Sadly, most of the wraps in this mani have been discontinued - Almond Ombre, which is on my left pinky finger, the mustache French tips, which are adorably called Uno Momo, and the plaid on my right pinky have all been discontinued. The flowery wrap on my left middle finger is called Flapper and it's still around in Jamberry's shop, woohoo! The animal print on my left pinky is Hear Me Roar.

A lot of people around the internet dislike Jamberry, for a variety of reasons. The biggest one is that they're a lot harder to apply than the company makes it look - and that's definitely true. I still need some practice - you can see the wrinkles on some of my nails. But my favorite thing about Jamberry is that once I've finished applying them, I'm done. This manicure may have taken me 45 minutes, but when I was done, I was able to whip up dinner immediately without having to worry about smudging, chipping, or denting my nails. And honestly, 45 minutes for this many nail art designs is nothing! (At least the way I paint my nails, ha.) For a solid color nail, I definitely prefer polish, but I really like using Jamberry for nail art.
Have you ever tried Jamberry, or any other of the different kinds of nail wraps out there? What did you think of them? Let me know in the comments!
November 12, 2015
Zoya Flair: Estelle and Aggie
When Zoya first released photos of their Fall 2015 collections Focus and Flair, I was a bit unimpressed. I felt like I'd already seen most of the colors before, some of them even by Zoya themselves. Then the first few blog posts on the collections came out, and to be honest, I still felt the same way about most of the colors. They all look quite pretty, but they just didn't seem as original as most of the Zoya polishes have since I first started buying from them in spring 2014. Maybe that just happens after you own 273 bottles of nail polish - it takes a heck of a lot more flair in a nail polish to make me say, "I need that!" than it did when I only owned 13 bottles.
But of course, I wanted the blue metallic, Estelle. Do I ever not want the blue metallic polish in any given collection? And Aggie, an intriguing colorshift metallic, looked so different and interesting that I had to have it.
Estelle is an absolutely gorgeous shade of blue. Let's face it, to me, every shade of blue is gorgeous, and I think I say that about every shade of blue polish I ever review. Estelle is probably the closest imitator of sapphire that I've seen - many have imitated the color pretty well, but few have gotten the brilliant sparkle of the stone. The way the polish sparkles on my nail kind of brings out their curvature - but not in a weird, "her nails are really bendy" way. It's more of a "this polish has tons of depth and really reflects the light" kind of curvature.

The first coat of Estelle is quite sheer, but the second coat yields perfect opacity. A lot of Zoya's darker metallics are almost one-coaters, but not this one. I almost always use two coats anyway, just to make sure the line bordering my cuticles looks good, so that's not a big deal for me.

I really love the texture of the metallic. It's incredible how many different types of metallic nail polish there are! I've actually been meaning to create a guide to the different types of metallics, but now I kind of feel like there are just too many to document. But definitely let me know in the comments if you would like to see a guide to the different textures!
Aggie is definitely the most unique polish in this collection. Its colorshift looks very striking in the bottle, with hints of blue-green at the edges, but on the nail it isn't quite so shifty.

In different types of light, it looks very different. It's a warm gold, almost leaning copper, under my yellowish lamps, but as I was washing my hands in my white-lit bathroom, it almost looked like a chocolate brown. The blue-green shift that I see in the bottle doesn't really show up at all on the nail, nor did it show up in my pictures.

The photos on Zoya's website are actually very accurate. You can see the greenish hues in the bottle shot, but not on the swatch photo or the pool of polish.

Aggie's formula is very nice. It's thin, but not watery, and opaque at two coats. Very nice application, which is no surprise with Zoya.

Even though this polish wasn't exactly what I expected, I still really like this color! It reminds me of the changing autumn leaves.
Zoya describes the texture of both of these polishes as "liquid metal," and I totally agree with that. They're both so sparkly and smooth!
Do you have any of the polishes from this collection? Which is your favorite? Do any of them feel like dupes to you? Let me know in the comments!
But of course, I wanted the blue metallic, Estelle. Do I ever not want the blue metallic polish in any given collection? And Aggie, an intriguing colorshift metallic, looked so different and interesting that I had to have it.
Zoya Flair: Estelle
Estelle is an absolutely gorgeous shade of blue. Let's face it, to me, every shade of blue is gorgeous, and I think I say that about every shade of blue polish I ever review. Estelle is probably the closest imitator of sapphire that I've seen - many have imitated the color pretty well, but few have gotten the brilliant sparkle of the stone. The way the polish sparkles on my nail kind of brings out their curvature - but not in a weird, "her nails are really bendy" way. It's more of a "this polish has tons of depth and really reflects the light" kind of curvature.

The first coat of Estelle is quite sheer, but the second coat yields perfect opacity. A lot of Zoya's darker metallics are almost one-coaters, but not this one. I almost always use two coats anyway, just to make sure the line bordering my cuticles looks good, so that's not a big deal for me.

I really love the texture of the metallic. It's incredible how many different types of metallic nail polish there are! I've actually been meaning to create a guide to the different types of metallics, but now I kind of feel like there are just too many to document. But definitely let me know in the comments if you would like to see a guide to the different textures!
Zoya Flair: Aggie
Aggie is definitely the most unique polish in this collection. Its colorshift looks very striking in the bottle, with hints of blue-green at the edges, but on the nail it isn't quite so shifty.

In different types of light, it looks very different. It's a warm gold, almost leaning copper, under my yellowish lamps, but as I was washing my hands in my white-lit bathroom, it almost looked like a chocolate brown. The blue-green shift that I see in the bottle doesn't really show up at all on the nail, nor did it show up in my pictures.

The photos on Zoya's website are actually very accurate. You can see the greenish hues in the bottle shot, but not on the swatch photo or the pool of polish.

Aggie's formula is very nice. It's thin, but not watery, and opaque at two coats. Very nice application, which is no surprise with Zoya.

Even though this polish wasn't exactly what I expected, I still really like this color! It reminds me of the changing autumn leaves.
Zoya describes the texture of both of these polishes as "liquid metal," and I totally agree with that. They're both so sparkly and smooth!
Do you have any of the polishes from this collection? Which is your favorite? Do any of them feel like dupes to you? Let me know in the comments!
November 4, 2015
Zoya Penny
Back in the beginning of the year, I placed a rather large order of polish with Zoya. They'd just announced the end of the Pixie Dust line, so I picked out a bunch of my favorite shades, and then decided to clear out my wish list and spend enough money to get free shipping. When my order arrived, I was super excited to find that three full-sized bottles of polish had been thrown in as a complete bonus! They weren't even listed as a gift on my packing slip. The polishes were Penny, Demi, and Shivon. I think all three of them have been discontinued by Zoya, as they're quite old - Penny and Demi are from the Fall 2009 collections, and Shivon is from Winter 2008. I have no idea why I got them all for free, but it makes me super happy!
Zoya Penny (which you can still apparently find on Amazon) is, naturally, a beautiful copper metallic. It's a classic metallic texture, with no flakies or colorshift or large glitters - just sparkly. But that doesn't make it any less beautiful!
 The formula on Penny is very interesting. It's quite thin, so cuticle flooding is definitely a concern with it, yet somehow it is almost 100% opaque after one coat. Honestly, I think that if I just had bare nail under it and not painted white tips using Zoya's Naked system, I could have been happy with one coat! But because my tips were so bright, there was a little bit of VNL, so I used two coats. I've never seen such a thin polish be so opaque! Why isn't every nail polish like this??
I did end up with a lot of air bubbles in this manicure, and they're pretty visible in the above photo. I'm not really sure if they're from Penny itself or if they came from my top coat (which is, as always, two coats of Out The Door).
For as long as I can remember, I've been collecting pressed pennies on trips. While I was in Michigan this summer, I was telling my aunt about Penny and my pennies, and she suggested that I model my hands with my penny collection! I can't believe I didn't think to do that the moment I got Penny! ;)

I could go into detail about almost every penny here, but that would be pretty off topic. That's how special my pennies are to me, though - aside from 3 or 4 which I've had for almost my entire life (from attractions that I went to several times throughout my childhood), I can narrow each penny down to the trip, even the month and year, that I got it from.

I got my souvenir collecting book from the Detroit Zoo, thus the animals on the cover. I grew up less than 2 miles away from the zoo and it is one of my favorite places in the whole world. They don't have a pressed penny machine there (if anybody from the Zoo reads this, please consider getting one!), and even though the book doesn't say "Detroit Zoo" on it anywhere, I'm pretty happy knowing that my collection is in a book that came from my hometown zoo.
Does anybody else collect pressed pennies? Are there any other perfectly penny-copper nail polishes out there that I should get my hands on (for Do I Need Them All, perhaps?) Let me know in the comments!
Zoya Penny (which you can still apparently find on Amazon) is, naturally, a beautiful copper metallic. It's a classic metallic texture, with no flakies or colorshift or large glitters - just sparkly. But that doesn't make it any less beautiful!

I did end up with a lot of air bubbles in this manicure, and they're pretty visible in the above photo. I'm not really sure if they're from Penny itself or if they came from my top coat (which is, as always, two coats of Out The Door).
For as long as I can remember, I've been collecting pressed pennies on trips. While I was in Michigan this summer, I was telling my aunt about Penny and my pennies, and she suggested that I model my hands with my penny collection! I can't believe I didn't think to do that the moment I got Penny! ;)

I could go into detail about almost every penny here, but that would be pretty off topic. That's how special my pennies are to me, though - aside from 3 or 4 which I've had for almost my entire life (from attractions that I went to several times throughout my childhood), I can narrow each penny down to the trip, even the month and year, that I got it from.

I got my souvenir collecting book from the Detroit Zoo, thus the animals on the cover. I grew up less than 2 miles away from the zoo and it is one of my favorite places in the whole world. They don't have a pressed penny machine there (if anybody from the Zoo reads this, please consider getting one!), and even though the book doesn't say "Detroit Zoo" on it anywhere, I'm pretty happy knowing that my collection is in a book that came from my hometown zoo.
Does anybody else collect pressed pennies? Are there any other perfectly penny-copper nail polishes out there that I should get my hands on (for Do I Need Them All, perhaps?) Let me know in the comments!
October 29, 2015
Zoya Pixie Dust Halloween nail art
Remember a few months ago when I shared my collection of Zoya Pixie Dusts, and I said that three of the colors would be perfect for a Halloween manicure? Well, right before I discovered the nail art challenge that I've been doing all month, I combined those three colors for a fun stripey mani.

Zoya Beatrix, Carter, and Dahlia turned out to be absolutely perfect together for Halloween! I used a makeup sponge to put them on for a gradient look.

I realize that I could have used this for the challenge theme on the 7th, when the theme was patterns, but that felt a little like cheating since I had painted this design over a week before. So you guys get a bonus mani this month! October is fun. :)

What is your absolute favorite manicure design for Halloween? Let me know in the comments!
October 28, 2015
October nail art challenge day 28: Monsters
Well, here we are. The second to last theme of this year's Halloween nail art challenge. Today's theme is monsters, and I cooked up a lot of them on my nails!

My nails house a mummy, Frankenstein's monster, a witch, and a vampire.

On the opposite hand, I painted something that abstractly represents each creature - except for the mummy, for which I couldn't think of anything else to represent. So I painted the Bride of Frankenstein['s mosnter], some stitches to represent the monster himself, witch-y colored stripes, and dripping blood. (Sadly, the purple that I used didn't show up very well at the top of my ring finger - nor did the drips show up very well on top of the purple metallic background. Oh well!)
On my thumbs, I painted a werewolf on the left and a full moon (sort of) on the right.

I used a whole bunch of different polishes for this look, and once again it's much easier if I just list them rather than describe which polish I used where.
Salon Perfect: Sugar Cube, Oil Slick, Loopy Lime, Escape to Neverland, A Royal Affair, and Traffic Cone
Zoya: Ziv, Nyssa, and Ana
Finger Paints: Monet Money and Ch-art-coal Black
OPI My Dogsled is a Hybrid
China Glaze Intelligence, Integrity & Courage
Heather's Hues Vampirette
Creative Cuticles Nail Polish O Negative Please
Sally Hansen Big Smoky Topcoat
I want to point out the awesomeness that is the vampire's skin color. I applied a coat of Vampirette, thinking that I would do a smaller vampire face on a purple background, but then decided against that. And I didn't want to bother with removing the polish and starting over from basecoat, so I put a coat of Ana on top of the purple. It turned out to be a sort of grayish-purple skin color, perfect for the skin of the undead!
Other than the witch-y stripes and the dripping blood, which I made using vinyls from KB Shimmer and Nails Redesigned, respectively, all of these monsters were made totally freehand. It took forever but it was a lot of fun!

All that's left in this month's challenge is nails to match my costume. My options are limited because of limited nail polish technology in the 1920s, but I'm pretty excited for my costume! We're going to be having some relatives over for the weekend of Halloween, so I might not have that blog post ready until the Monday after Halloween, but you'll definitely get to see my design for my flapper costume!
What are you dressing up as for Halloween this year? Do you plan on painting your nails to match? Let me know in the comments!

Once again, I had to use the dreaded flash because the deep green of Frankenstein's monster wouldn't show up without it.
My nails house a mummy, Frankenstein's monster, a witch, and a vampire.

On the opposite hand, I painted something that abstractly represents each creature - except for the mummy, for which I couldn't think of anything else to represent. So I painted the Bride of Frankenstein['s mosnter], some stitches to represent the monster himself, witch-y colored stripes, and dripping blood. (Sadly, the purple that I used didn't show up very well at the top of my ring finger - nor did the drips show up very well on top of the purple metallic background. Oh well!)
On my thumbs, I painted a werewolf on the left and a full moon (sort of) on the right.

I used a whole bunch of different polishes for this look, and once again it's much easier if I just list them rather than describe which polish I used where.
Salon Perfect: Sugar Cube, Oil Slick, Loopy Lime, Escape to Neverland, A Royal Affair, and Traffic Cone
Zoya: Ziv, Nyssa, and Ana
Finger Paints: Monet Money and Ch-art-coal Black
OPI My Dogsled is a Hybrid
China Glaze Intelligence, Integrity & Courage
Heather's Hues Vampirette
Creative Cuticles Nail Polish O Negative Please
Sally Hansen Big Smoky Topcoat
I want to point out the awesomeness that is the vampire's skin color. I applied a coat of Vampirette, thinking that I would do a smaller vampire face on a purple background, but then decided against that. And I didn't want to bother with removing the polish and starting over from basecoat, so I put a coat of Ana on top of the purple. It turned out to be a sort of grayish-purple skin color, perfect for the skin of the undead!
Other than the witch-y stripes and the dripping blood, which I made using vinyls from KB Shimmer and Nails Redesigned, respectively, all of these monsters were made totally freehand. It took forever but it was a lot of fun!

All that's left in this month's challenge is nails to match my costume. My options are limited because of limited nail polish technology in the 1920s, but I'm pretty excited for my costume! We're going to be having some relatives over for the weekend of Halloween, so I might not have that blog post ready until the Monday after Halloween, but you'll definitely get to see my design for my flapper costume!
What are you dressing up as for Halloween this year? Do you plan on painting your nails to match? Let me know in the comments!
October 26, 2015
October nail art challenge Day 25: Blood
Warning: this one's a bit gory! If you're grossed out by gore, you might want to skip this post.
I'll throw the challenge image up top this time, to buffer the gore and make it easier to avoid seeing:

I TORE UP MY THUMB NAILS CLAWING MY WAY OUT OF MY OWN GRAVE.

Just kidding.

Actually, I did decide at the last minute to cut my left thumb nail up to make it look torn. I keep my right thumb nail super short because otherwise I scratch my eyeball when I take my contacts out, so inspired by YouTuber Klairdelys, I used a fake nail to give the appearance of a truly torn up nail.

The rest of my fingers are a bit less gory, though I did decide to pool the red polish at my cuticles rather than keep them clean. And I kind of messed up when placing some of my vinyls (which are from Nails Redesigned), so the drips ended upside down on half of my nails. Oh well! It was an intentional design element. Yeah.
 I actually used a different black polish than usual this time! I recently won a polish giveaway from Nail It! magazine and received 8 different Salon Perfect shades for Halloween. Their black polish is called Oil Slick, and that's the one I used for this design. The white is Salon Perfect Sugar Cube. My blood red colors are Nails Inc, London Kensington High Street (the darker red pooled at my cuticles) and Sally Hansen CSM Red My Lips (the brighter red all over my thumbs).

What do you think about this rather gory nail art? I hope it didn't gross you out too much! Tell me what you think of this one!
There are only two designs left in this challenge - which is exciting because that means Halloween is fast approaching, but it's also sad because that means October is almost over. How will you be doing your nails on the 31st? Let me know in the comments!
I'll throw the challenge image up top this time, to buffer the gore and make it easier to avoid seeing:
I TORE UP MY THUMB NAILS CLAWING MY WAY OUT OF MY OWN GRAVE.
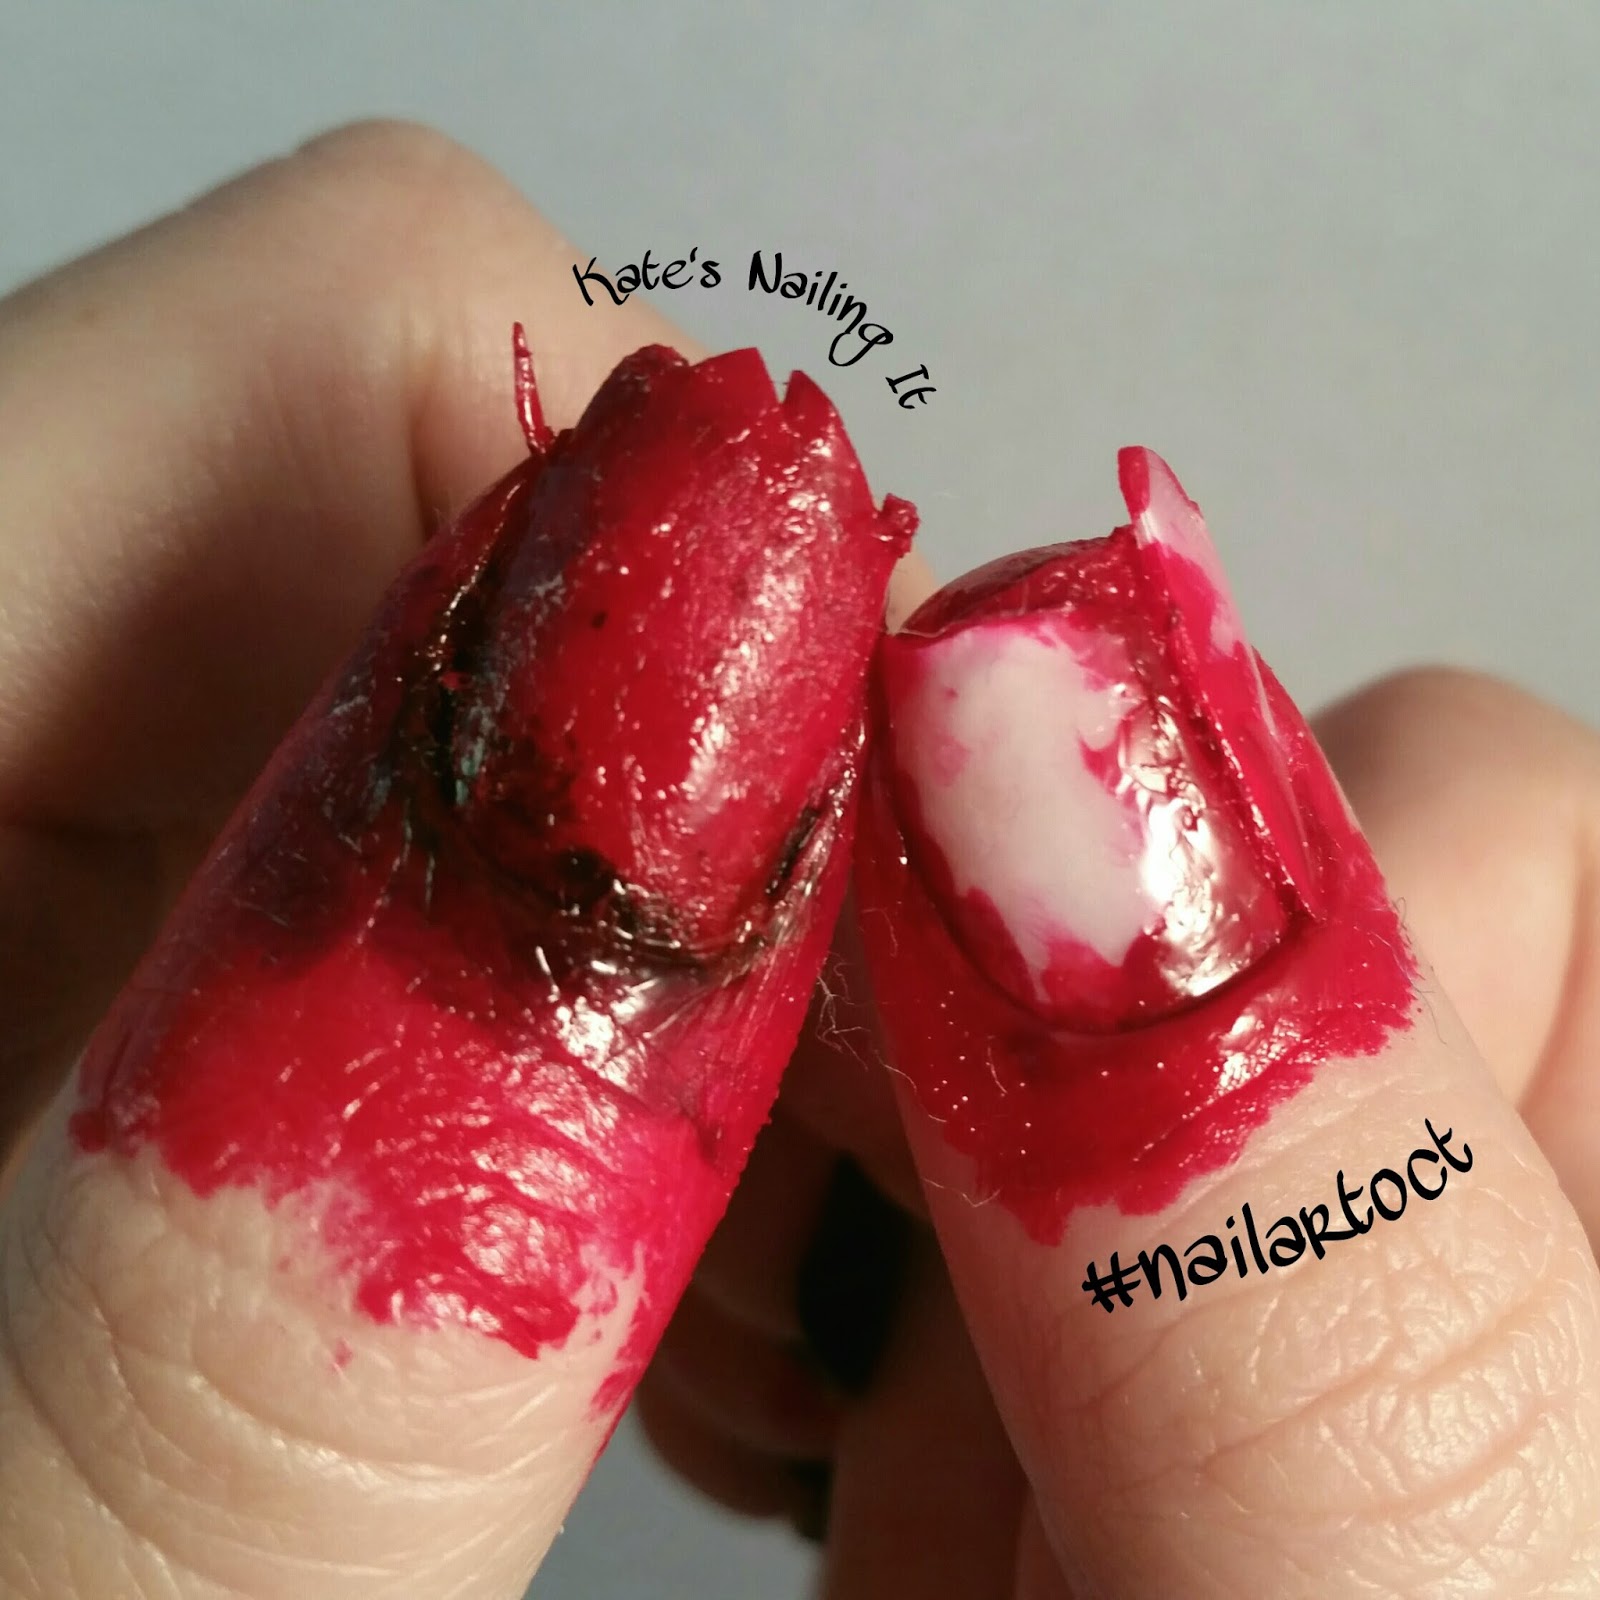
Just kidding.

Actually, I did decide at the last minute to cut my left thumb nail up to make it look torn. I keep my right thumb nail super short because otherwise I scratch my eyeball when I take my contacts out, so inspired by YouTuber Klairdelys, I used a fake nail to give the appearance of a truly torn up nail.

The rest of my fingers are a bit less gory, though I did decide to pool the red polish at my cuticles rather than keep them clean. And I kind of messed up when placing some of my vinyls (which are from Nails Redesigned), so the drips ended upside down on half of my nails. Oh well! It was an intentional design element. Yeah.

The blood with the white background ended up upside down because of how I placed the vinyls.

I usually hate using flash for nail photos, but it helped let the red-on-black nails show up a bit better.
What do you think about this rather gory nail art? I hope it didn't gross you out too much! Tell me what you think of this one!
There are only two designs left in this challenge - which is exciting because that means Halloween is fast approaching, but it's also sad because that means October is almost over. How will you be doing your nails on the 31st? Let me know in the comments!
Subscribe to:
Comments (Atom)