Showing posts with label KB Shimmer. Show all posts

November 22, 2016

Halloween costume nails

Now that it's two days before Thanksgiving, I'll share what I wore on my nails for Halloween!

Derek and I went as Bob and Linda Belcher for Halloween this year!


It was such an awesome costume!  Although my wig was pretty atrocious.  The picture on the bag was a cute little 50s flip, and I ended up with this tangled mass of not even slightly flipped hair.  But at least it was more accurate to Linda than my chin-length blonde-and-blue hair!

I wasn't quite sure what to do with my nails for Linda, though.  We never really see Linda's nails - in fact, the only instance of anyone's nails being drawn into question I can remember is when Louise Belcher gets those ridiculous talons on the cruise ship.  So, I had to improvise.  What would Linda Belcher wear on her nails to a Halloween party?

Perhaps... some awesome trick-or-treat water decals!


I got these decals from KBShimmer a few weeks ago.  I wasn't sure what to expect from using full-nail decals for the first time; my nails are super curvy, so laying flat things on them doesn't tend to work out very well.  But water decals are incredibly flexible, and they're also so thin that two coats of top coat completely smooths out any wrinkles!  I was very impressed.


The color is also really nicely opaque.  I was nervous for the black background over white polish, but it looks great!  I am definitely a satisfied customer with these water slide decals - and I'm really glad that I bought some hilarious kitty Christmas decals!

I want to take a moment to rave about how much I loved dressing up as Linda.  First of all, it was super cheap: I already owned the jeans, and I got the shirt and apron at a thrift store; the wig and glasses were pretty inexpensive, too!  Secondly, it was really comfortable.  I mean, my jeans are a bit snug on me, which sucked, but I got to wear long sleeves, long pants, and sneakers for Halloween!  The worst part about the costume was the wig cap and wig - they pulled at my scalp a bit and made my head hot and itchy.  But, clothing-wise, this is hands-down the most comfortable costume of my life.  And practical, too!  The apron had big pockets, big enough for all of my essentials so that I didn't need to carry a purse with me!  Big win.

But another reason I was so happy with this costume is a bit more psychological.  Linda Belcher is a Mom, and she has a Mom Bod.  Of course, I know that people of any body type can dress as any character they want.  If I had the seamstress skills, I would dress as Uma Therman's Poison Ivy in a heartbeat, even though I pretty much have the opposite body type as Uma.  But I have never felt so in-character with my jiggly bits!  It was really refreshing to not feel like my body type is an inaccuracy.  It was probably the most comfortable in my own skin I've been underneath my costume!

Bonus costume photo!  Frosting is cake skin right?  Lemme lick it!

What did you do for Halloween?  Let me know or show me in the comments, I really want to see!

October 26, 2016

KBShimmer Be Scareful

KBShimmer's Be Scareful released in Fall 2015.  I got it a few weeks ago from a destash sale - I forget whose it was, but she had a lot of awesome indie polishes up!  I limited myself to one, and of course I chose a Halloween themed polish.

I applied Be Scareful using the sponge method.  First I brushed on one thin coat, to get an even coverage of the white crelly base, and then I sponged on two more layers of the glitter.


Isn't it so fun?  It looks like Halloween threw up on my nails!  I'm definitely glad that I used the sponging method.  The crelly base applies nicely, but the glitters are large enough that it's tough to brush them on.  I highly, highly recommend that you try out the sponge method!  Of course, if you do, you should protect your cuticles with some kind of peel-off barrier, because you'll get glitter all over your skin without it.


As you can see, it's not completely opaque - there's still some noticeable VNL.  I could have tried out one more layer, or layered this over a coat of solid white, but I wasn't all that concerned with getting full opacity.


Look at those tiny little orange glitters floating in there!  They're not super noticeable to the naked eye, but once you get this close up, it's hard to miss anything.

Oh, and when I went to bed after applying this polish, I got a pretty big surprise...


Be Scareful GLOWS IN THE DARK YASS!  I love a surprise glow in the dark nail polish!  I'm always like, "what's that weird light coming from - IT'S MY NAILS?!" and then I shove my hands in Derek's face and he's a bit concerned for my sanity.

Because it's Halloween, and because I still have plenty of the water decals that I used last Halloween, I decided to do some art on top of this!


I just love these decals!  They're so cute.  I mean - scary! :)


My friends at my crochet group were particularly thrilled with the spiderweb decal on my thumb.


Be Scareful isn't available anymore, but KBShimmer has an AMAZING lineup for autumn 2016!

What do you think of this polish?  What are your favorite KBShimmers?  Have your nails been celebrating Halloween all month long like mine have?  Let me know in the comments!

November 25, 2015

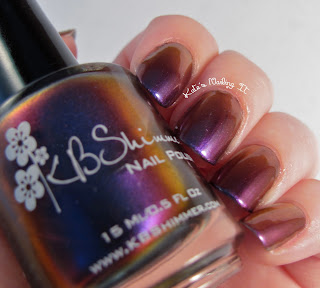
KB Shimmer: Pigment of My Imagination

This is my first KB Shimmer nail polish purchase, and I couldn't have chosen a better polish to start with!

I've never owned a true multichrome polish like this one.  I seem to recall a weird rose-gold-to-snot-green shift that my Mom had when I was a kid, but the awkward green shift rendered it pretty much unwearable.  I guess multichrome technology has gotten better since then - either that, or the color shift effects just work better when the different colors blend together well!

I almost have to wear gloves when I drive with this polish on.  It is so hard to take my eyes off of!


The main color in Pigment of My Imagination is purple, but boy oh boy does it shift around.


Above you can see it has a reddish shift at this angle, and next up it becomes a bit more goldish-red-purple:


See that streak of very very gold near the edges of the bottle?  Usually a shift like that doesn't show up on my camera.  But this one absolutely does!


WHAT. HOW IS THIS THE SAME POLISH.  I promise I didn't get my photos mixed up!  This incredible red-copper color is indeed still Pigment of My Imagination.  The first three  photos were taken under my yellowish lamps and inside my light box (which softens the light and helps reduce glare.)  The photo above is directly under the same lamp, without the light box.  I found that the more direct the light, the more pronounced the colorshift is.


Direct sunlight makes Pigment of My Imagination lean more blue-purple.  But indirect sunlight...


... makes the color lean more towards that reddish-coppery tone, though it's still very purple at the right angle.


This one was taken in the whitest light I have - my bathroom, haha.  In whiter light, this polish continues to lean towards the blue end of the purple spectrum, still with a flash of the coppery tones.


I swear, this polish is at least half magic potion!  This is another picture taken under my yellowish lamps, without the soft box.  It's a completely new shade of purple that we haven't really seen in the other pictures!  I seriously couldn't stop taking pictures of this polish.  It just shifts so much!  I love it!

Formula-wise, Pigment of My Imagination is quite lovely.  It's thin, but not watery.  The first coat is pretty sheer, but the second coat makes it perfectly opaque.

Although I think my pictures have captured at least most of the different colors in this polish, I think a video does it much better!  Feast your eyes (or click here to watch the video on YouTube):


What do you think of this polish?  Do you own any multichromes?  Did you own any of the unfortunate snot-green multichromes of the late 90s/early 2000s?  Let me know in the comments!

By the way - Happy Thanksgiving weekend to my American followers!  My birthday is on Thanksgiving this year so I'm going to have an amazing weekend :D What are you doing for the holiday weekend?  Let me know in the comments!

October 28, 2015

October nail art challenge day 28: Monsters

Well, here we are.  The second to last theme of this year's Halloween nail art challenge.  Today's theme is monsters, and I cooked up a lot of them on my nails!

 
Once again, I had to use the dreaded flash because the deep green of Frankenstein's monster wouldn't show up without it.

My nails house a mummy, Frankenstein's monster, a witch, and a vampire.


On the opposite hand, I painted something that abstractly represents each creature - except for the mummy, for which I couldn't think of anything else to represent.  So I painted the Bride of Frankenstein['s mosnter], some stitches to represent the monster himself, witch-y colored stripes, and dripping blood.  (Sadly, the purple that I used didn't show up very well at the top of my ring finger - nor did the drips show up very well on top of the purple metallic background.  Oh well!)

On my thumbs, I painted a werewolf on the left and a full moon (sort of) on the right.


I used a whole bunch of different polishes for this look, and once again it's much easier if I just list them rather than describe which polish I used where.

Salon Perfect: Sugar Cube, Oil Slick, Loopy Lime, Escape to Neverland, A Royal Affair, and Traffic Cone
Zoya: Ziv, Nyssa, and Ana
Finger Paints: Monet Money and Ch-art-coal Black
OPI My Dogsled is a Hybrid
China Glaze Intelligence, Integrity & Courage
Heather's Hues Vampirette
Creative Cuticles Nail Polish O Negative Please
Sally Hansen Big Smoky Topcoat

I want to point out the awesomeness that is the vampire's skin color.  I applied a coat of Vampirette, thinking that I would do a smaller vampire face on a purple background, but then decided against that.  And I didn't want to bother with removing the polish and starting over from basecoat, so I put a coat of Ana on top of the purple.  It turned out to be a sort of grayish-purple skin color, perfect for the skin of the undead!

Other than the witch-y stripes and the dripping blood, which I made using vinyls from KB Shimmer and Nails Redesigned, respectively, all of these monsters were made totally freehand.  It took forever but it was a lot of fun!


All that's left in this month's challenge is nails to match my costume.  My options are limited because of limited nail polish technology in the 1920s, but I'm pretty excited for my costume!  We're going to be having some relatives over for the weekend of Halloween, so I might not have that blog post ready until the Monday after Halloween, but you'll definitely get to see my design for my flapper costume!

What are you dressing up as for Halloween this year?  Do you plan on painting your nails to match?  Let me know in the comments!