September 20, 2014

Zoya Pixie Dust: Liberty plus Some Other Stuff

I mentioned Zoya's Pixie Dust in my post on the eight blue-green-golds, so I figured I'd do a swatch of it!  I, of course, have my Pixie Dust in the brightest blue possible, "Liberty."

Zoya Liberty


Pixie Dust is the most sparkly polish I've seen yet.  It's like having tiny crushed blue diamonds on my nails!  It actually doesn't work well with a top coat, even a shiny one like Out The Door.  A top coat flattens out the texture of the glitters, which mutes the sparkle.


Application is, as always with Zoya, really nice.  Two coats is perfect.

Taken in feeble evening sunlight.

A cool thing about Pixie Dust is how dark the color is, but with the sparkles it's incredibly bright.  I love it and I can't stop staring at my nails!

Taken on my cell phone in the car - don't worry, I was parked!  Direct sunlight.

The best part about the texture of Pixie Dust is that it's very forgiving.  If you miss a spot, if you smear it while it's still wet, or if it chips when dry and you go over it with a few little dabs, you can barely tell!  That makes me really happy because I used my glue basecoat for this, and it chipped a lot sooner than I would have liked.  I dabbed a tiny bit over the chipped spots and you have to really be looking closely at my nails to be able to tell that I patched any chips!

Nail Stains


Liberty stained the CRAP out of my nails.  Really, really blue.  I used this color when I first got it with my usual basecoat, and I don't recall it staining; I think that the glue basecoat is just really porous and allows staining.  Maybe in the future I'll try using a coat or two of my usual basecoat on top of the glue and see how that goes.  In any case, I wanted to take this opportunity to share my solution to stained nails, and it's really simple: toothpaste!

"*gasp* I'm naked!!" - My nails

I can't remember where online I read or heard this, but somewhere out there somebody recommended using normal toothpaste to get rid of polish stains on nails.  I wanted to try it out, but I don't own a nail brush.  I DO, however, have like 5 extra toothbrushes laying around, so I grabbed a fresh one and used that to scrub away my nail stains.  And it totally worked!  These stains were really bad, and they were on all ten nails, so it took a good 10-15 minutes to work the stains away.  But that's a heck of a lot better than waiting two months for the stains to grow out, feeling sad and embarrassed about my naked nails in the mean time!

I trimmed and filed my nails a bit before taking this after photo.  Toothpaste didn't make my nails shorter!

The glue basecoat didn't work very well with Liberty, anyway.  Rather than pop off in one big piece, it flaked off only with the use of an orangewood stick dipped in acetone.  I ended up removing it the usual way - the Deborah Lippman method - and it was still a struggle, but it worked better and faster than scraping it all off.

I painted my toe nails!


Sandal season is coming to an end, and I wanted to send it off with a bang by painting my toe nails to match my favorite pair of sandals ever.

When I saw these gladiator-style sandals in the store with my mom, I was like "Haha, those are CRAZY, I just have to try them on!"  The moment I zipped them up (the zippers have little tassels on them!), Mom and I were totally baffled at how awesome they were.  Isn't it awesome how sometimes you can think something is way outside your style comfort zone, only to turn around and completely adore it within moments?

Anyway, five years later, I'm looking for a gold metallic nail polish and I find "Gladiator" by Nina Ultra Pro.  It's a great brassy-gold, and since it's called Gladiator, I wanted to wear it to match my gladiator sandals.  It's also a really nice way to transition into fall, since it's not super bright but not quite as deep as most fall colors.

September 15, 2014

Part of Two Pleasant Peninsulas by ALiquid Lacquer

I've really been getting in to indie nail polish makers lately, and my most recent indie polish was a gift from my mom.  As I was browsing through ALiquid Lacquer's shop,, I discovered their collection inspired by all things Michigan, called Two Pleasant Peninsulas.

As some of you may know, I'm from Michigan, and I moved to Maryland a little over a year ago.  Even though it's been over a year, I still get totally homesick when I think about my home state, so I loved this collection immediately.  All the polishes in it are really cool and they have great names, but there were three that stuck out to me the most.  Wolverine Loves Spartan is awesome because I went to Michigan State University, and about half of my family are University of Michigan fans.  I'm Heading Strait to Mackinac is special to me because I love visiting Mackinac Island - it's one of the most beautiful, romantic places in Michigan (and for those of you who don't know, the Straits of Mackinac are the waters that separate Michigan's peninsulas, so that's why it's spelled that way).  And finally, I hold Motor City dear because I grew up in the suburbs of Detroit and I absolutely adore the city.  I'm the kind of person who will give you a 20-minute lecture if you make a joke about Detroit being a bad place.

And, conveniently enough, the three polishes with names most dear to me also happened to be my favorite colors in this collection!

Who else was a dear?  My mom!  She ordered these three polishes and had them delivered to my house in Maryland.  So I totally got these awesome polishes without having to break my polish-buying embargo!  Heck yeah!  I've been staring at these colors for days while working on other blog posts, and it's finally time to wear them and review them.  So let's get to it!

Motor City 


Sweet baby Jesus, I ADORE this nail polish!  It's a glitterbomb in a black jelly base, and the glitters are sooooo awesome.  The website says that it's inspired by Detroit based on Motown music and the auto industry - the glitters certainly remind me of those things!  The biggest circular glitters remind me of records.

JUST LOOK AT ALL THAT GLITTER.  HRRRNNNNGGGHH.

I just couldn't get enough of this polish!  Glitterbombs always provide a unique application on each nail, so I wasn't surprised about that, but oh my gosh, each nail was so amazing and awesome on its own!


This is the first polish in a while where I've actually REALLY liked having a matte topcoat on it.  I think matte flattens out all polishes, and in this case it makes it look amazing.  It just made me think of space, somehow!

I LOVED the way those two glitters in the center stacked, and then reflected blue in the light.

It was a bit tricky to get the bigger pieces of glitter to apply to my nail, but that's fairly standard for glitters so big.  Three coats looked nice, but you all know as well as I do that I did four coats. 

Wolverine Loves Spartan


Wolverine Loves Spartan reminds me of those giant, fist-sized jawbreakers.  It's a glitterbomb in a white crelly base - that's a creme-y jelly.  Not as thin as a jelly, not as thick as a creme.  The glitters vary in size and shape, and the colors represent Michigan's two biggest universities: blue and yellow for University of Michigan (boooo), and green to go with the white base for Michigan State University (GO GREEEN!).


I put a matte topcoat on my ring finger, and I really like it!  It makes it look even more like a jawbreaker candy.

Three coats yields great opacity and glitter depth.


This is the perfect Game Day polish - I'll definitely be wearing it on the day of MSU vs U of M!

I'm Heading Strait to Mackinac


This is a really, really pretty polish!  It's a creme with a subtle holographic sparkle, which is a simply gorgeous effect. 


It photographs a little bit brighter and bluer than it actually is - it's more of a periwinkle in person.  My camera had some trouble capturing the holo in it, of course.


I put a matte top coat on my ring finger, but it actually muted the holo sparkles a bit too much for my taste.

Two coats is perfect on this one.  One coat was actually really close to perfect, but there were a few small spots that I needed to go over again.

I'm super, super happy with all of these polishes.  I'd love to own the whole collection some day!  What are your favorites from Two Pleasant Peninsulas?

September 12, 2014

Fifty Shades of Blue

Just kidding with the title - it's only eight shades of blue.

You may recall from my post on Zoya's Muse that I own a lot of blue nail polishes - specifically, sparkly blue-green-gold polishes.  If you want to talk about all shades of blue and all different textures, it's 32 blue polishes.  That's just about one third of my entire nail polish collection.

Some of these blue-green-gold polishes are so ridiculously similar in the bottle that it's a good thing I don't have them displayed near each other on a shelf.  You'd think I was on a quest to own as many dupes of the same color as possible.  Once you get them on the nail, though, most of them actually look a lot different.  There are two polishes that still look pretty similar, but neither is an actual dupe of the other.

After listing all eight of these colors in my previous post, I decided to paint them all together and then swatch each one, then throw all of them into the same post.  Don't worry, I didn't paint my nails nine times in one day!  I've been building this post for days now, a few colors at a time.  And, since I conveniently have two hands, I've only been painting each color on one hand.

Since this post has so many different colors in it, I'm not going to go into much detail about each one, nor will I share as many pictures of each color as I usually do.

Fifty Eight Shades of Grey Blue


No explanation really necessary here: this is each and every one of my blue-green-gold polishes all conveniently lined up on eight fingers!


And here's a shot of the bottles lined up, all looking ridiculously similar.

OPI "Austin-Tatious Turquoise"


Austin-tatious is one of my very oldest nail polishes; I'm pretty sure I've had this bottle since middle school.  I'm now a year and a half out of college.  It's a blue-purple metallic, but my camera wouldn't capture the purple no matter how I tried.  The purple is actually fairly subtle - it's not quite a duochrome.  Three to four coats - it's very sheer.

Zoya "Charla"

I dropped the bottle and mercifully it didn't break, but it did get smooshed on one corner :(

Charla is a really great metallic shimmer with a lot of green and gold undertones in the blue.  Of course, my camera couldn't pick up on the gold in indoor lighting very well, though you can see it in the top of the bottle.  Two coats yields perfect opacity.  Application is absolutely wonderful.  And cleanup is nice and easy - the color is light enough that it doesn't stain.

Nicole by OPI "Candid Cameron"


Candid Cameron is from the Modern Family collection - it's inspired by the character Cameron Tucker.  It's a blue-green duochrome metallic, and I ADORE it.  Once again, my camera didn't want to capture the duochrome-iness of it, but I think you can kind of see it in the bottle in this picture.  I matte-d the ring finger, but I'm not crazy about it - the matte really detracted from the gorgeous colorshift, really flattening the color.

Sinful Colors "Nail Junkie"


If I didn't get Nail Junkie as a gift almost two years ago, I'd think it was a dupe of Muse.  They're very similar - but definitely different quality.  Nail Junkie's glitters are much bigger than Muse's, and it applies a bit thicker than Muse does.  Actually, it's gotten quite goopy in two years; I used a few drops of nail polish thinner to make it easier to apply.  The glitter is in a clear base, so it's a good one to layer over a creme polish!  My ring finger has a base coat of Sinful Colors "Why Not?" in this photo; the middle finger has a matte top coat.

Zoya "Muse"


I've already done a complete swatch of Muse; you can find that post here. Muse is probably my favorite of these eight polishes.  It's so sparkly and the colorshift is so mesmerizing!

Zoya "Remy"


I've also already done a complete swatch of Remy.  You can find that one here.  While Remy comes out very dark on the nail, in the bottle is has the same gold-ish shimmer that a lot of these polishes have.  I'm not really sure what happens to the gold... maybe it only looks gold because of the way the light bends when it hits the glass bottle?

Nicole by OPI "That's What I Mint"


That's What I Mint is very interesting; I'd say it's the most unique texture I own.  If you're familiar with Zoya's Pixie Dusts, it's sort of like that, but there's definitely something different about it.  This is from the Gumdrops collection, and the tag describes it as a "matte 3D glitter."  The polish base is sort of matte, but the glitters are so sparkly that you can hardly tell.  My ring finger has a matte top coat, which totally flattened it; middle finger has my usual Out The Door, which flattens it a little; pointer and pinky have no topcoat, which I think helps it keep its sparkle.

Julep "Lizanne"


Lizanne is a lot more green than the rest of these polishes, and it showed up even greener on my camera.  It has a really nice, subtle sparkle in it (I wouldn't even call this a shimmer or metallic polish; it's really a creme with some shimmering in it).  Again, my camera hardly captured the shimmer, but you can see it in the bottle beneath the word "Julep."  Julep tends to have insufferably thick, goopy polishes, but Lizanne was actually pretty cooperative.  It's definitely among the thicker polishes in my collection, but it's not insufferable.  I rather like it - it reminds me of the Emerald City, somehow.

What's your favorite of these colors?  Do you think I'm ridiculous for owning all of them?  Let me know in the comments!

September 8, 2014

Reverie Nail Lacquer: Nightfall

Remember from my post on Andromeda and Mermaid Scales how I said that Reverie threw in a mini bottle of polish that wasn't in the store?  As it turns out, it was a sneak peak at their 2014 fall collection!  I felt super special, and wanted to be sure to swatch it before the collection was released!  So let's get to it!

Nightfall is a gorgeous purple holographic polish.  The sparkles have a green tint to them.  Not in a weird, puke-y green way, and not in a Barney the dinosaur way, but in a beautiful, shimmery kind of way!  It looks so elegant.  In some lighting, it almost has a taupe-ish hue to it.  (Between Mermaid Scales and Nightfall, I think I'm a little obsessed with holos and now I want them ALL.)  Unfortunately, my stupid camera wouldn't capture the green very well, and the Universe didn't play nice and give me a sunny day today.


Nightfall is not as sheer as Mermaid Scales.  Two coats looked great, but it was still a liiiittle bit sheer for my taste, so I went up to three coats.

The focus is bad on this one, but it helps to show off the rainbow effect of the holo.
I wish it also showed off the green tint!

On my left ring finger, I used one coat of Sally Hansen CSM "Trouble Maker" as a base coat, and only two coats of Nightfall.  I adore it!  It helps to bring out the purple in the holo, yet also brings out the rainbow shimmer effect.  I think I wish I only used one coat of Nightfall.  Trouble Maker shows through pretty well in the photo, but in person it's masked a little too hard.


On my left pointer finger, I tried using a coat of Nina Ultra Pro "Black" as a base, and I wasn't crazy about the effect.  It sort of brings out the green in the holo, which is kind of nice, but I definitely prefer either no base color or purple.  In this picture, it looks pretty neat and galaxy-like, but it's a bit... weirder in person.


Reverie's fall collection will be available for preorder this weekend, Friday September 12th through Sunday the 14th; its official release date is Saturday the 27th.  Check out Reverie's Facebook page and their shop!  I really really want Lagoon from this collection - but thanks to my recent polish-buying embargo, I'll just have to work out extra hard if I want to buy it!  (Though I DO have a birthday sort of coming up... *wink*)  What are your favorites from the collection?  Scroll through Reverie's Facebook page, or check out The Mercurial Magpie's review, to see the polishes and let me know!

PS You can now find me on Bloglovin'! Follow my blog with Bloglovin!

September 7, 2014

American Advice, Volume 1: The Importance of Wearing Nail Polish

My blog just turned one month old yesterday!   And since the tagline of my blog is "French tips and American advice," I figured it was about time I shared some advice on nail care!  There's a LOT of rambling I can do about nail care, so I'll be rambling about a different aspect of nail care throughout a series of American Advice posts.  Today I'm going to be focusing on ways to keep your nails strong and healthy.

The easiest part of my nail care process is that I take Biotin vitamins every morning with my breakfast.  I buy it in 5000mcg, and I think it's also sold in 1000mcg pills.  Biotin will help your nails (and hair!) to grow faster and stronger, making it much easier to have long nails - and keeping short nails healthier.  (Biotin also helps with digestion of carbohydrates, so if you love bread as much as I do, it can be quite helpful there!)

But it takes close to three months to see the effects of taking Biotin, because that's how long it takes your nails to grow out completely.  (Obviously, this varies based on how long you keep your nails.)  So what do you do while you wait for the Biotin-enhanced nails to grow out, to help prevent your nails from cracking, chipping, peeling, and breaking?

First things first - NEVER go naked.  EVER.  We're often told by various beauty magazines and such that nail polish prevents our nails from "breathing," and that we should spend some time without anything painted on our nails.  This is super untrue!  Our nails need to breathe about as much as our dishes do.  Nail polish actually acts like a shield for our nails.  Nails need their natural oils in order to stay strong and healthy.  Water, as we know, washes away oils, especially if you throw soap into the mix - which I hope you do after you go to the bathroom.  But nail polish can help to slow down the rate of water absorption, because polish isn't as porous as nails! 

Ever notice how after a shower, your nails are sort of bendy?  That's the water absorption.  But shower with nail polish on and your nails won't be quite as bendy afterwards - because the layers of polish helped to keep the water out.  Slowing down water absorption is very important for nail health, because wet nails are super susceptible to cracking, peeling, and breaking.

Now, I know we can't all make sure to have perfect nail polish on our nails at all times - even I can't always have a pretty color or design on my nails, and I don't have a job or a social life.  There are plenty of nail strengtheners on the market that are a simple clear paint, so you can throw it on your nails quickly after removing your previous manicure.  I use Sally Hansen Advanced Hard as Nails.  Other good products include OPI Nail Envy and ORLY's variety of nail strengtheners.  Probably every major nail polish company makes a strengthening base coat of sorts.  If you don't feel like spending the extra dough, I recommend at least using a few coats of your usual base coat polish between manicures.

One thing that still plagues my nails, even after 8 months of taking Biotin, is peeling.  The problem with peeling nails is that once it peels once, the nail is going to tend to peel in the same place continually as the nail continues to grow.  It's sort of like perforated paper: once it rips, it's really easy to keep ripping and sort of hard to stop it ripping.  So how do you stop it?  Well, if anyone knows, please tell me!

But really, it is super hard to stop nails from peeling once they start.  The wrong thing to do, however, is to peel them on purpose.  If you notice a layer of nail trying to peel off, don't encourage it!  The best thing I can say is to keep polish on that baby at all costs.  BUT, don't let that nail polish crack or chip!  Chipped polish can break off a layer of your nail.  Try to keep that bit of peeling nail secured down (with polish or nail glue) until it grows out.

All right, I think that's enough for one post.  For more detailed information about the strength of nail polish, check out this post on Nail Care HQ, and for more details about nail peeling, check out this post.

September 5, 2014

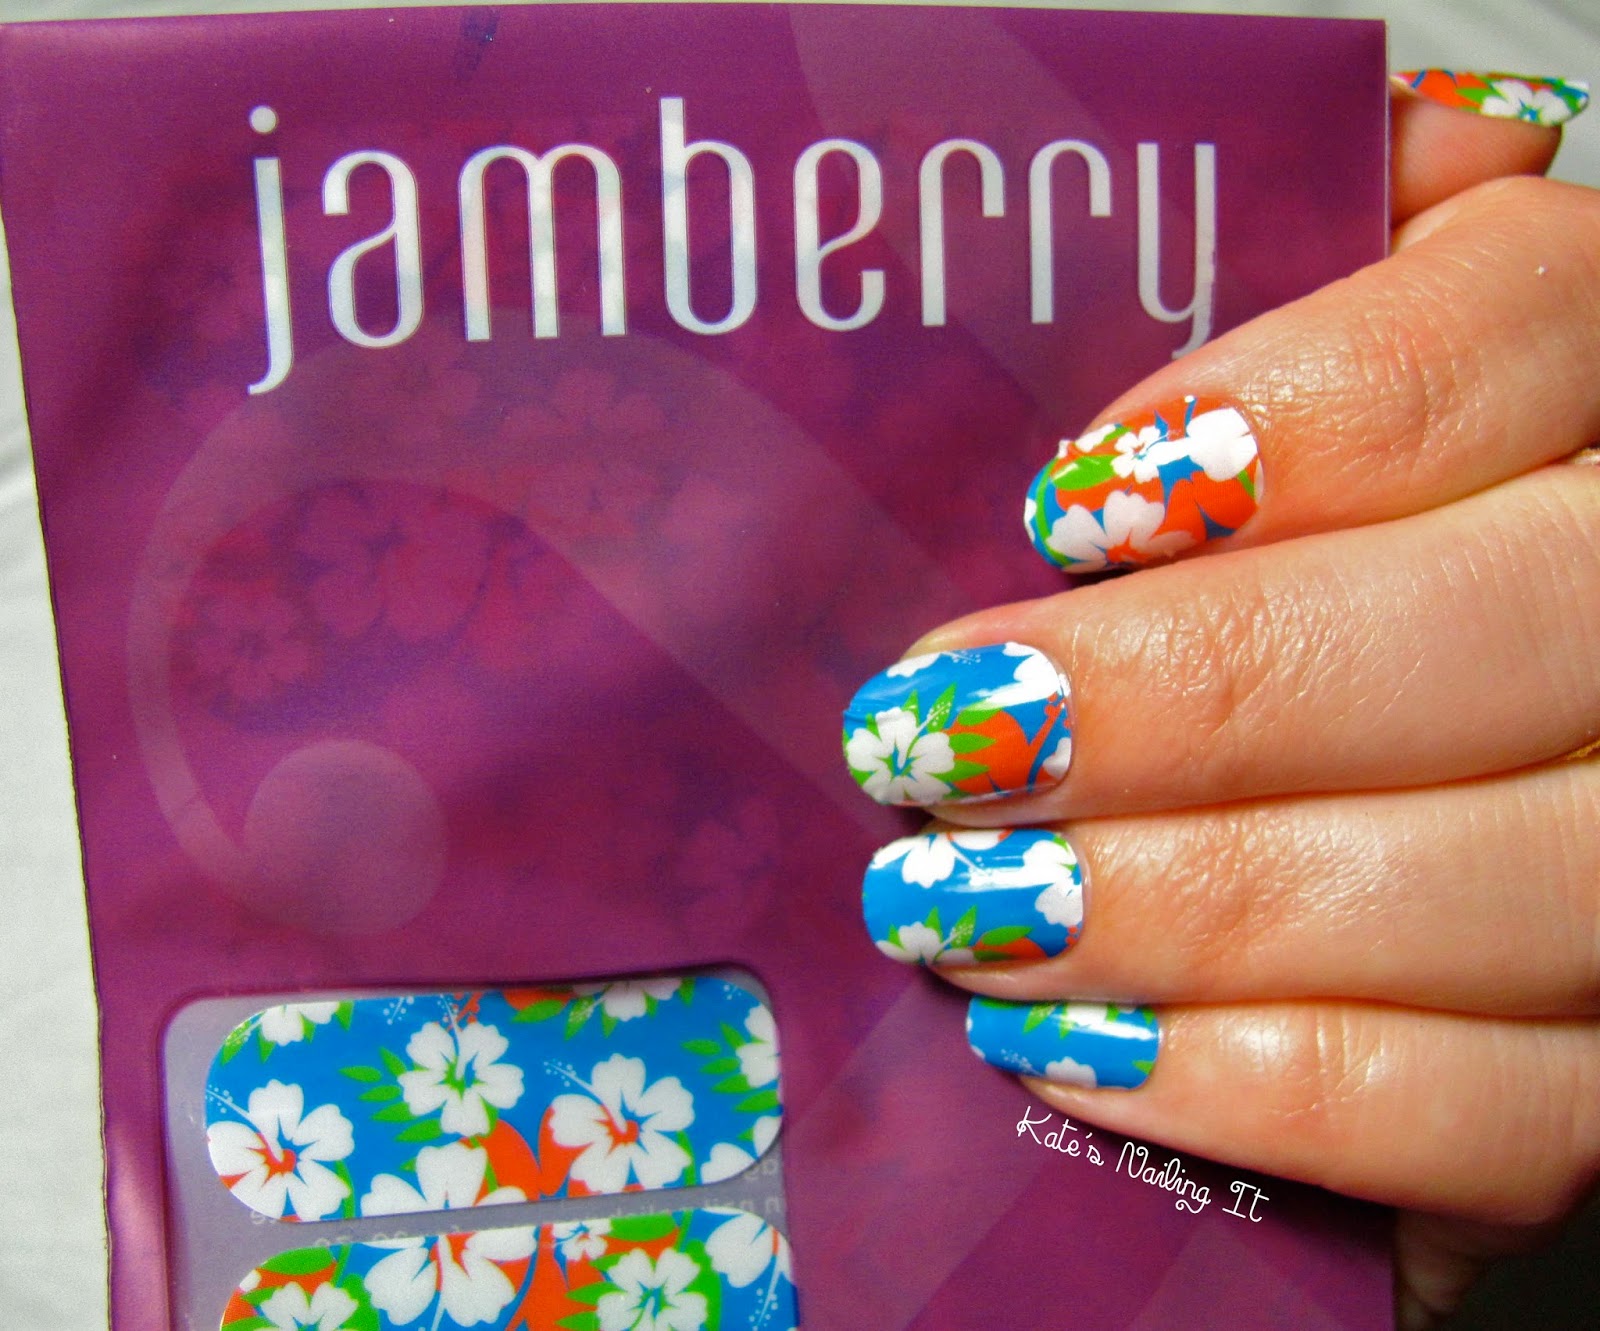
Something different: Jamberry Nail Wraps

There may be only a few posts on this blog, but it's already time for something a little different!  There's no nail polish in this blog post whatsoever.

A few months ago, my cousin held an online party for Jamberry Nail Wraps.  I'd never heard of them, but I pretty much jumped on the wagon immediately because, like any girlie party (Tupperware, Pure Romance, and the like), there were free prizes for participating in the Facebook group - and we all know how much I love free things!

Anyway, I ended up choosing only one design to buy: "Aloha Flower" (unfortunately, this style isn't in the shop anymore, so I can't give you a link for it).  A huge reason I picked that one is because it totally matches my awesome tank top that I got early this summer!  And, while I haven't posted any clothes-matching manis on the blog yet, I LOVE it when my nails match my clothes.  (Check it: here and here.)

Phone quality, because I forgot to take a picture with the tank top when I had my camera and lamp set up.

I finally decided to try out the wraps today, and I'm pretty impressed!  The instructions mentioned "if applying over lacquer," which I took to mean that it's safe to apply on top of polish.  (They sell a few patterns with a clear background.)  I threw on my usual two coats of Sally Hansen Hard as Nails, to help my nails stay stronger with extra layers of stuff on them.


Application of the wraps is a little bit tricky, but it's a pretty simple concept.  You pick the wrap that best fits your nail and grab it with either tweezers or an orangewood stick, then heat it up.  The website and instructions tell you to use a special mini heater (which of course Jamberry sells), or else use a blow dryer.  I don't own a blow dryer, so I used my bedroom space heater, and it worked just fine!  Hold the wrap in front of the heat for a few seconds until it warms up, then stick it on your nail.  Cut off the excess, then file off any bits of wrap extending above the edge of your nail.

 I'm holding Zoya "Wendy" in this one, if you're curious.

I found that it was easier to avoid wrinkles on the edge of the wrap if I cut it fairly close to the length of my nail before putting it on.  For the first three nails, I left the wraps at their full length - one and a half inches - and I ended up with LOTS of wrinkles at the very tip of my nails.  (Most of my nails are close to half an inch long.  That's a LOT of excess wrap!)  By my ring finger, I realized that if I cut the wrap much shorter first, it was less likely to wrinkle at the tip.

Pretty severe wrinkling here.

I wanted to paint one nail on each hand on my own - I happen to have the perfect blue to match the background of this pattern, and a pretty good green and orange and of course a white - but I chickened out.  For one thing, it was getting too close to dinner time, and for another, I didn't want to have eight computer-perfect designed nails and then two nails that look just a little too wibbly.  But each Jamberry set comes with two stickers of every size, so I'll be able to do this again, and maybe then I'll try my hand at painting to match!

Here, I'm holding Zoya "Mitzi."

(I think it's worth noting that the pattern doesn't look as dot-y as it does in the super closeup pictures that I took.  To the naked eye, this is a perfectly smooth pattern.)

Obligatory "holding the product" shot, even though it's fairly awkward to hold the floppy envelope for a picture.
Also, will my pinky nail ever NOT be partially hidden underneath my ring finger?

Jamberry says that these wraps can last up to 14 days.  I definitely won't be wearing them for that long, because I'll need to change my nails in order to write another blog post!  I'll update this post to talk about how they fare after the weekend, and I'll also mention how well they come off.

Update 9/7/14

took the wraps off late Saturday night.  Predictably, the wraps that had wrinkled on the edges started to peel off a little bit.  The peeling wasn't so bad that the wraps risked falling off, but it did make my nails sort of painful, like they had teeny tiny swords on the edges of them.  On the few nails with perfect application, I had no peeling on the edges of my nails and would have been happy to keep them on until I was ready to change my nails!

Let me just say this before I describe the process:  DO NOT, UNDER ANY CIRCUMSTANCES, WEAR THESE ON TOP OF ANY KIND OF NAIL POLISH, LACQUER, OR NAIL STRENGTHENER/HARDENER.

The website and packaging give you three different ways to remove the wraps: re-heat them in front of your heat source and peel them off; soak your nails in acetone for a few seconds and peel them off; or soak your nails in warm water for a few seconds and peel them off.  NONE of these methods work properly if the wraps were applied over lacquer.  It seems that the glue on the wraps bonded to the strengthener on my nails, making it very difficult to take the wraps off.  Everything was a sticky mess.  What ended up working was: I dipped an orangewood stick in acetone and worked it underneath the wraps, then pulled them off and cleaned the goo off my nails with more acetone.  Since I had the nail strengthener on all of my nails, I can't say for certain whether the wraps would leave a gooey mess on bare nails; I certainly hope not!

All in all, I was quite happy with these wraps and I definitely recommend trying them out!

September 3, 2014

Zoya Tickled and Bubbly: Harper and Wendy

As I mentioned a few posts ago, Zoya recently had a Buy One Get One Free sale on ALL of their summer colors to celebrate the end of summer.  I took advantage and celebrated the end of summer by buying two of the pinks from their Tickled and Bubbly collections: Wendy and Harper!  There isn't really much more I can say as an intro here, so let's get right to the swatches!

Zoya Tickled: Wendy

Wendy is a great pink creme polish.  Application, as always with Zoya's polishes, is really nice.  Two coats is perfect.  The formula is not too thin, not too thick, and any missed spots in your first coat will even out nicely on the second coat.

Somehow, the upload sort of washed out the colors here.  This looks like a coral on my monitor, but it's really much more pink in person.
It's such a bright, happy shade of pink!  It reminds me of cotton candy and other yummy pink candies.

Zoya Bubble: Harper

Harper is a vibrant pink glitter polish, very similar to Muse, which is no surprise since they're from the same collection.  Harper doesn't have the same colorshift that Muse has in different lighting, though - it's always a bright, happy pink.  Two coats is perfect for full coverage, but you could go to three for more sparkle.  (I actually didn't this time - can you believe it?!)

The upload washed out the colors on this one, too!  It's a bit brighter than this in person, and there's more gold in the sparkles.
Application is great - I feel like I should just stop saying that for Zoya polishes and only mention application if it's not good!

If you know me personally, or if you've read my post on Muse, you'll know that I have an addiction to blue and therefore might be a little surprised that I ordered two pink colors instead of two new blue ones.  Well, I was a little surprised at myself too!  But my nail polish collection is a little bit lacking in the pink department, and my summer wardrobe actually has a lot of pink in it, so I decided to go with these lovely ladies.

Harper and Wendy pair together perfectly.  Wendy looks great with a Harper French tip, chevron, or full coverage - and vice versa.  I played around with painting them over each other and they look great!  I didn't take pictures of that, though, because frankly I didn't feel like it.  "Muse", however, doesn't look that great on top of either of these.  Zoya "Robyn" looks quite nice, though!  ("Ling" is the blue creme paired with Muse, but I decided not to get it as I have several bright blue cremes already.  Robyn is very similar to Ling!)

What are your favorite shades from Tickled and Bubbly?  Let me know in the comments!