June 25, 2015

ALL the Zoya Pixie Dusts!

**This is another incredibly old post, which I wrote mostly in January.  It's just been sitting around for ages!**

Okay, not all of them.  I can't afford that.  But, in the last few months, I've been accumulating as many of the Pixie Dusts as possible, because as you may have heard, Zoya is discontinuing Pixie Dusts.  All of them.  They're selling out the rest of their stock, but they won't be making any more once they sell out.  They'd better have some amazing plans to replace those beauties!

So, while Pixie Dusts may still be easily attainable for now, pretty soon they're going to be super rare.  Naturally, I just had to buy up all the colors I care about (and then some!) before they end up costing $50 on eBay or Amazon. 

I'll be sure to check the website and note any that are already sold out at the time of publishing (and maybe I'll even update it as the colors disappear). **Somehow, six months after Zoya announced the end of the Pixie Dust line, every single color is still available in the store.  I guess they made an insanely huge batch of each color before announcing their discontinuation.  Suddenly I feel a bit silly for buying up so many Pixie Dusts right away!**

Liberty


I've already written a full review of Liberty, which you can find here.  But I just wanted to throw a few pictures of it in here, since I have all of my Pixie Dusts in this post!


Liberty was the first Pixie Dust I ever got; it was even one of my first few Zoya polishes! 

I think this is the most insanely long my nails ever got!  I keep them much shorter now.

Godiva


Godiva is one of the colors that I bought way back when Zoya was selling 3 minis for $15 in November/December.  I wasn't super crazy about it online, but I ended up falling in love once I put it on!


A creamy, beige-y neutral color that almost leans peach, Godiva is absolutely beautiful in the Classic Pixie Dust formula.  Two coats yields full coverage, though looking at my photos there is still a tiiiiiny bit of VNL showing through.  Many people have compared Godiva to Tomoko as they're insanely similar, but I don't own Tomoko and don't plan to buy it.  From what I've seen and read online, Godiva is a warmer neutral while Tomoko is more cool-toned.

Nyx


Nyx is a soft, periwinkle-lavender with silver shimmer.  The silver actually surprised me - most of the Pixie Dusts I've seen have been more... I don't want to say flat, because the sparkles are anything but flat - but color-wise, I guess they've been more uniform.  If you look at Liberty and Godiva, there isn't a ton of color variation, just sparkle.


Nyx was mostly opaque at two coats, but I could still see a bit of the whites of my nails at certain angles.  Shown is two coats.  I did three coats on my right hand, and I was surprised by the difference in color!  At two coats, Nyx is definitely a softer periwinkle, but at three coats it leans more to a stormy lavender.


Beatrix


Beatrix is a great, bright, sunny orange with yellow-gold sparkles.  The yellow-gold definitely doesn't stand out from the orange base as much as the silver stands out in Nyx, which I like.


Two coats was, like Nyx, pretty opaque, but if I stared at my nails long enough I could kind of see the whites of my nails.  I tested out a third coat on my thumb, and it's definitely fully opaque; what's also nice is that the color didn't change very much, as it did with Nyx.


Just for fun, I threw on one coat of China Glaze's Fairy Dust over top of two coats of Beatrix, because hell, there can never be enough sparkle!  Even though you lose the texture of the Pixie Dust a little bit, the holographic sparkle from Fairy Dust makes it super awesome.  If you want your nails to be show-stoppers, I'd highly recommend Fairy Dust-ing that shit. ;)


P.S. don't mind my lack of pinkie in some of  these photos.  Two days before swatching Beatrix, my pinkie got in a nasty fight with a cheese grater and lost.  Right above my cuticle.  That nail was out-of-commission for nail polish for a while. :(

Carter


For some reason, I found myself much less able to look away from Carter than any other Pixie Dust so far.  I honestly can't really say why, except that its formula is just so flawless.  And I don't just mean that two coats was perfectly opaque, nor do I just mean that it applies super smoothly (as do all of the 'Dusts).  I think Carter is just more perfectly dense with glitter than those I've shown so far; it's also the most uniform color so far.  Liberty is also pretty uniform, but something about Carter made me really, really glad that I didn't have to drive anywhere while I was wearing it, because I probably would not have looked at the road very much.


Carter is a perfect shade of purple, too; it really doesn't lean reddish or blueish or lavenderish or any other -ish.  It's really a true, royal purple.

Dahlia


Dahlia is the last of the Classic Pixie Dusts that I own.  Like Nyx, Dahlia has a lot of very prominent silver sparkle to it.  But since the main color is black, it doesn't really stand out as that different.


Two coats was perfectly opaque, but it still looked a tad charcoal-grey to me, so I put a third coat onto my middle finger.  There is a slight difference to the color, but it was so minimal that I decided to leave the rest of my nails at two coats.

Out-of-focus because I realized when swatching this one that I didn't take any out-of-focus photos
to show off the crazy sparkle of Pixie Dusts!

Unfortunately, Dahlia fell a little bit flat on its own.  The sparkle didn't photograph that well, as you can see, because of how dark it is; but it doesn't really sparkle THAT much more in person.  While most Pixie Dusts have a stunning sparkle, Dahlia is just kind of... sparkly black.  I probably won't be wearing this one on its own very much.  But Dahlia, Carter, and Beatrix would look amazing together for a Halloween-y mani.  I know what I'll be doing to my nails in a few months!

I also own a few of the Ultra Pixie Dusts, but since this post is already getting pretty long, I'm going to go ahead and give those their own separate post.

Which of the Pixie Dusts is your favorite?  Do you prefer the Classic or the Ultra finishes?  Let me know in the comments!

June 16, 2015

Ellagee: Glimmering Sapphire

Oh my gosh, this post has been sitting around in my Drafts section for months!  I think I need to start double-checking my drafts section more often!

Ever since I got a new car back in October, I've been on a quest to find a nail polish that matches it.  Because, why not?  It's a beautiful sparkly dark blue and, since I'm a nerd, I named it the TARDIS.  (My previous two cars were silver and light blue, so they were the Millennium Falcon and R2D2, respectively.)

On my quest to find a matching polish, I've come across a few that look pretty close, but Glimmering Sapphire by Ellagee looked the best online!  It's a bit more sparkly and glossy than my car (although she might just need a wash), but it's a pretty darned close match.


The formula of Glimmering Sapphire was kind of on the goopy side.  It was thick, and I found that shaking it after every couple of nails made it easier to work with.  But my polishes sit in my Helmer, which is a metal unit that sits underneath a drafty basement window, and it's winter (well, it was when I wrote this post, anyway).  It could be that the polish was too cold, and cold polish is almost always going to be thick.  Perhaps I should sit on my nail polishes for a few minutes before using them in the winter...


So, aside from the thickness which could well be my fault, I really like this polish!  It definitely needs two coats - I had guessed that its deep color would allow it to be almost, if not entirely, a one-coater, but the base is somewhat sheer at one coat.  Totally not a problem as I usually prefer to use two coats of polish anyway!  And two coats is perfect opacity.  It definitely wouldn't need three.

The color is truly gorgeous.  In dim light it's a pretty sparkly blue, but in brighter lighting the sparkle is absolutely stunning, and the overall color looks brighter!

Out of focus to better show its sparkle!

Ellagee actually makes a polish that's inspired by The TARDIS - called Sexy Old Girl - and at first I thought I'd get that one to match my car, but that one is definitely brighter and more glittery than my car.  I did, however, buy the TARDIS pendant that Ellagee sells, and it hangs from my rear view mirror! :)


Glimmering Sapphire is from Ellagee's Sparkling Gemstones collection and has a glittery partner, called Crushed Sapphire.

Do any of you name your cars after nerdy things?  Anyone else have a polish that matches their car?  Let me know in the comments!

PS - if you have a few minutes, I would really appreciate it if you took my survey!  I want to know what you think of the blog, how you interact with it on social media, and some other various details.  It should only take about 5-8 minutes, and who knows, your responses may lead to more of your favorite types of posts on the blog!

May 8, 2015

Temporary Blogging Break: I'm Moving!!!

Back in February, I decided to make it my goal to post once a week, every Wednesday.  Well, sometimes I forgot until Thursday or Friday, but for the most part I managed to keep that up for a while.  But lately, it's been a bit of a struggle, because...

Derek and I are moving!  Yes!  We're finally moving out of this crowded house full of discourteous housemates!  We found the place a month ago, and we're finally moving on May 15!

So, while I do have a few finished posts sitting around in my drafts section, I haven't been doing my nails as much over the last month.  Between preparing for the move and learning how to crochet (I could write another entire post about how much I love crocheting, omg), I've been lucky to paint my nails once per week.  And especially this week, with the move being so soon, I don't plan to do anything to my nails besides a layer of Nail Envy to keep them shielded.  I even cut them down to pre-Biotin lengths in order to avoid worrying about breaks and cracks on moving day!

My stash of ready-to-post drafts may end up lasting until I get settled in in the new apartment; it might not.  Neither Derek nor I has ever lived in a fully un-furnished place, so we have a lot of shopping to do!  It's exciting, but it definitely means that both my nails and the blog will have to take a back seat for at least a full week after we move.

I just wanted to post this announcement to let you all know that I'm taking a bit of a break, but I'll be back!  Whether it takes one week or three, I will eventually return to posting every Wednesday.  There are some really sad stories of nail bloggers who have built up a good following and then just stop blogging with no warning or explanation, and I want to make sure that nobody thinks that's happening here!

Definitely stick around on my social media pages - on Facebook I tend to focus only on nail- and blog-related stuff, but my Twitter and Instagram pages are also my personal accounts, so I'll probably still be fairly active over there.  (You might even get to see early pics of my new place on Instagram!)

One final thing: my reader survey is still active, and I'm still looking for more responses!  If you have about five minutes to spare, please click here to take the survey.  I really, really appreciate your feedback, and who knows - your feedback could lead to more of your favorite type of posts on the blog!

April 28, 2015

Watercolor Nail Art

I call this watercolor because that's kind of what it looks like, but there isn't any actual water involved in this manicure!  It's actually the dry brush technique, wherein you wipe off as much polish as possible and dab what's left on the brush onto the nail.  The end effect, especially once you put top coat on, really looks like an abstract watercolor painting!

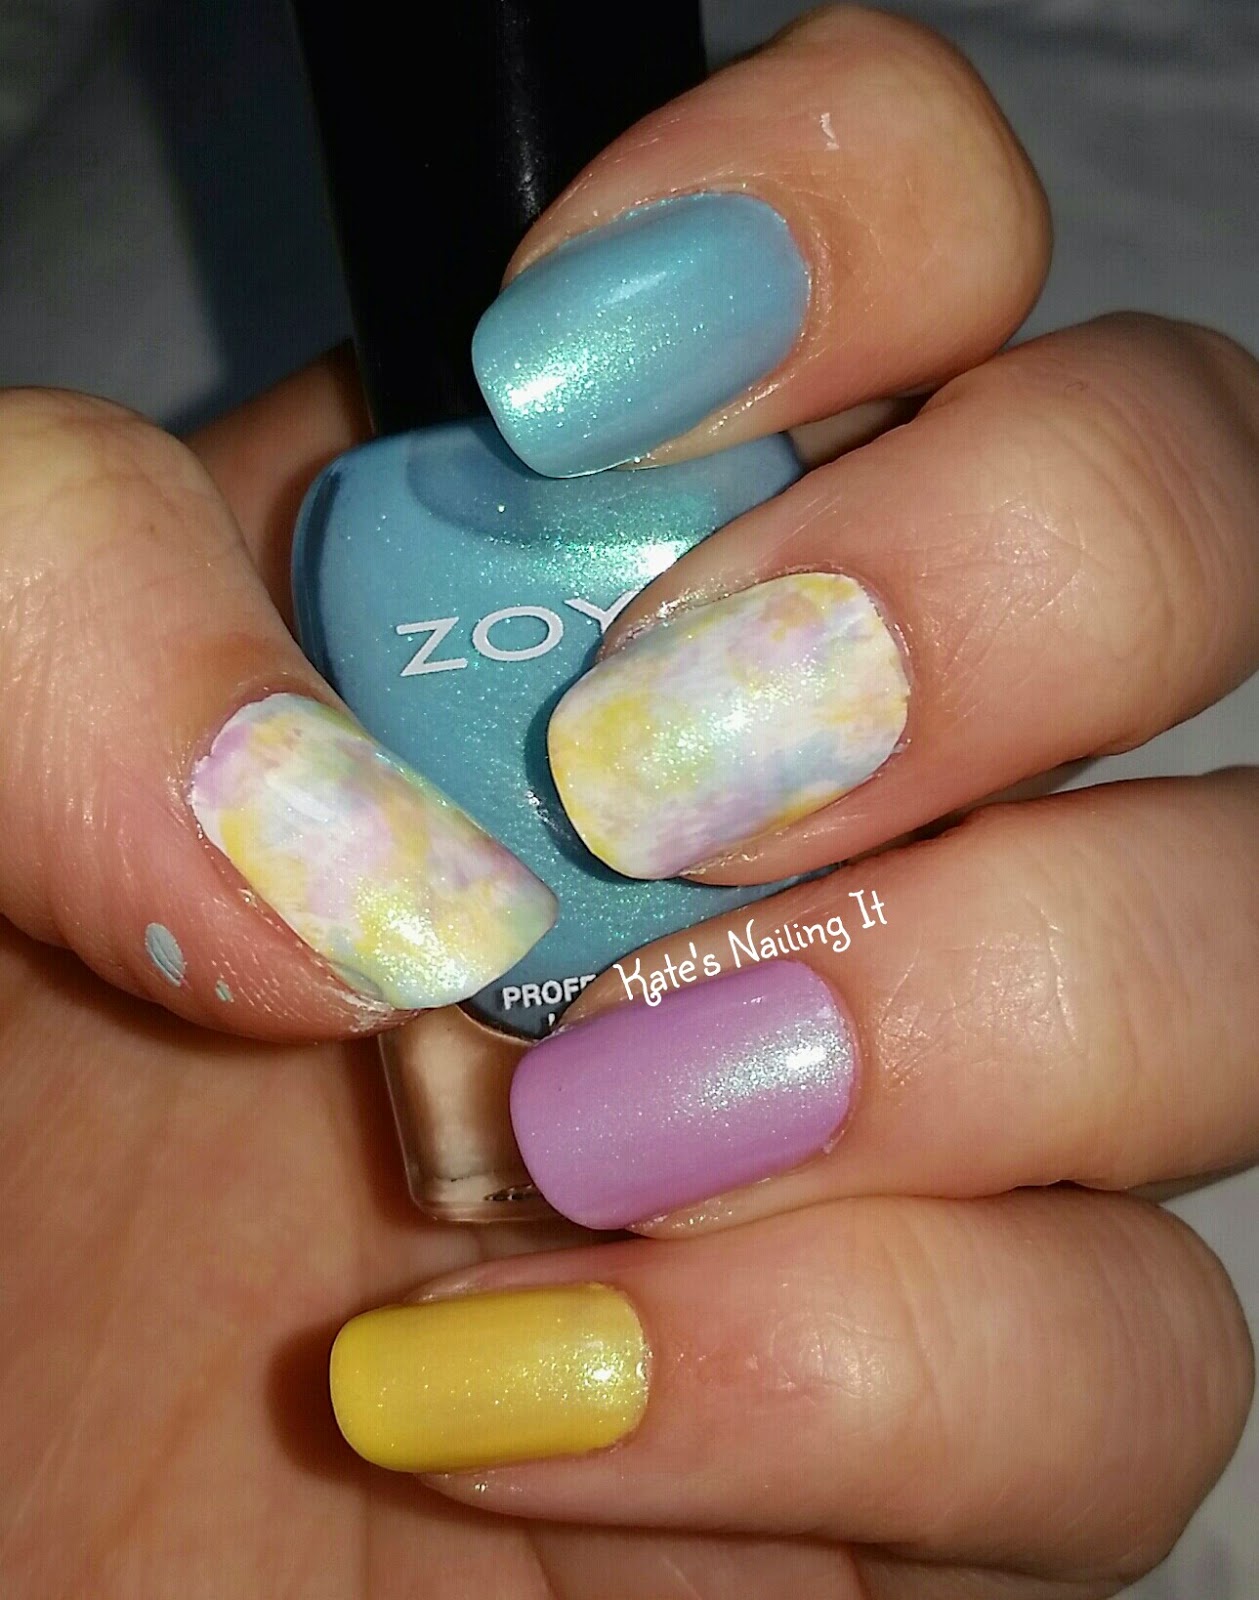
I'm super, super excited about this design. It was the perfect way to use every color from Zoya's Delight collection!  I ordered the whole collection in mini bottles on April Fool's Day, when they let you pick out any 6 mini polishes for free with purchase of three full size bottles.  (I also snagged two of the cremes from Tickled, last year's spring collection, and one older polish.)  On the one hand, I love the Delights collection so much that I feel like I'll want them in full sized bottles, but on the other hand, I have so much freaking nail polish that I would never ever use up full sized bottles, so the minis are just fine. :)

Anyway, since there are 3 cremes and 3 metallics in this collection, and I have ten fingers, I decided to pair the matching finishes on each hand and paint each color on one nail, using all three colors in nail art twice!  For the first time in a while, I'm really really happy with the way this turned out.  I've been feeling kind of down on my nail art skills lately, which is why I've been posting so many swatches and so little art for so long.  But this technique is super easy for me and, since it's so abstract, it's pretty hard to mess it up!

You'll have to forgive the smudge of paint on my thumb.  I was too excited to share this nail art to bother cleaning that off! :)

The blue is called Rayne; purple is Leslie; and the yellow is Daisy.  The white polish on all four art fingers is Salon Perfect Sugar Cube.


The blue creme is called Lillian; the pink is Eden; and the green is Tiana.

While I definitely love both looks, and every polish in this collection, I think I like the art made with the cremes a little bit better.  The pink just stands out so much and looks like flowers in a pond or something!

Please also forgive all of the scars on my knuckles.  My hands have been getting a lot of boo boos lately :(


I really wish I could have captured the turquoise shimmer in the yellow polish better!  It shows up nicely in the blue and purple polishes, but it's really pretty in the yellow one, too.  Maybe I'll just have to do a swatch post in the near future!

I made a photo tutorial for this look, as well!  I'd love to do another video tutorial, but my setup is really awkward and I just don't have the film technology that my film-degree-having self can sign off on.  


Step one: paint your nails with a base color (white is almost always going to work the best).

Steps two-three: wipe off as much of the polish as you can.  Your brush should look like the one in step 3 before you continue!

Step four: dab or smear the brush onto your nail.  It won't look neat, and it shouldn't!  Repeat steps 2-4 as many times as you'd like with a few different colors.  

Step five: add your top coat, and you're done!

I love how abstract this design is.  You could probably do this over a darker color for a different type of galaxy mani! (Adding that to my list of ideas.)

What's your favorite color from this collection?  Have you ever used the dry brush technique before?  Let me know (or show me!) in the comments!

PS: my reader survey is still active, and I'm still looking for more responses!  If you have about five minutes to spare, please click here to take the survey.  I really, really appreciate your feedback, and who knows - your feedback could lead to more of your favorite type of posts on the blog!

April 5, 2015

Easter Nails - then and now!

Hoppy Easter, every bunny! :D

I have some quick nail art for you tonight!  I've been a bit lazy with painting my nails lately - long story short, I'm apartment hunting and learning to crochet, so my nails are taking the back seat right now.  I'm still trying really hard to post something once a week, though!

Anyway, since I didn't spend a whole afternoon painting special Easter egg nails like I did last year, I did something a bit more quick this year.  I've had this half sheet of Jamberry nail wraps sitting around for ages, and every time I look at them I just think "These look too Easter-y for today."  So bam! I finally used them in an Easter mani! 


I have TONS of awesome springy polishes from my Bunny Box, and it took a while to narrow it down to only three to match the wraps!  I finally settled on He Doesn't Carrot All by Digital Nails (the pink), Purple Peep-le Eaters by Firecracker Lacquer (the purple), and Eggstra Special by Smokey Mountain Lacquers (the blue).  (All of these polishes were made specially for the Bunny Box collaboration, so I don't have a link to each polish for you!  The Jamberry wraps are also no longer available in the shop.)
 
I definitely put a lot more effort into my Easter nails last year - take a look!


My nails are actually pretty close to the length that they were one year ago!  I had two nails break REALLY badly a few weeks ago, so I chopped them all off, and decided that I liked them a bit shorter.  I'm not so sure now, I think I want to keep them longer again!

Did any of you do a special Easter mani this year?  What are your favorite Easter traditions?  Let me know in the comments!

PS - if you have a few minutes, I would really appreciate it if you took my survey!  I want to know what you think of the blog, how you interact with it on social media, and some other various details.  It should only take about 5-8 minutes!

March 25, 2015

Jamberry: Everything Nice

I've created enough wibbly nail art in my time to know that everything takes practice, and that nothing is ever as easy the first time you try it as the tutorial makes it look.  And that, I realized, also applies to applying nail wraps.

The first time I posted about Jamberry nail wraps was over the summer, and a string of recent online parties for Jamberry has re-ignited my interest in their products.  If you remember, the first time I applied Jams things were a bit wrinkly, and I ended up taking the wraps off within two days (the wraps are supposed to be able to last up to 14 days).  The second time I applied them was months later, and I didn't have much more success.  Another problem I had that time was that I used wraps that were too big on a few nails.  So lesson learned, Jams are the opposite of shoes: always size down rather than up!

Those wraps didn't stay on my nails very long either, and my application was so wrinkled and messy that I didn't even bother taking pictures.  But the good news is that each package of Jamberry comes with two wraps of each size, so I can still get a good long-lasting mani with that pattern!  (It was Crash Art, and it is awesome.)

Determined to get a long-lasting, pretty Jamberry mani, I watched a couple of videos with tips on how to apply them and tried again.  YouTube user BeautyandJams has lots of really great tutorial videos with some really neat tips and tricks for both applying and removing Jams.  So when I applied these wraps, called Everything Nice, I was very happy with my application results!  I still had a little bit of wrinkling, but this time it was only on my pointer fingers, rather than all of them.  I have long felt that my pointer finger nails bend kinda funny at the sides, and the fact that I only got wrinkles on those fingers solidifies that belief!


It's worth nothing, I think, that the patterns look far less pixelated in person than they do in the large photos.  Since they're printed from a computer, the designs are made up of pixels, and since you're seeing an image created by pixels, well, the pixels stand out a lot.  (Say "pixels" more, please.)  But in person, the designs look very smooth and pixel-free.


As great as these applied this time, I still took them off after just a few days.  It's hard to keep my nails the same for more than 4-5 days when I have a blog to run, after all!

Holding-the-product shots are super awkward when the product is a long, flat rectangle. :)

I'm currently hosting an online Jamberry party, so if you're interested in buying any wraps right now, please shop through this link and select my party - "Kate Jamz Into Spring" (or maybe it just has my name, Kate Wagner) - when you check out!  Jamberry has just released their new spring catalog and there are some great new wraps in there - and they have an amazing Mother's Day bundle available right now!

Have you ever tried Jamberry wraps, or any other kind of nail wrap?  How did you like them?  Let me know in the comments!

March 14, 2015

Pi Day 2015: The Date of the Century!

Starting in 2003, every year has had a cool consecutive date when written out numerically in the American fashion.  1/2/03, 3/4/05, all the way on up to 12/13/14 - which, sadly, is the last one that I'll see.

But this year?  This year holds the very best date that anyone alive will ever see.  Today is March 14, 2015: 3/14/15.  The best Pi Day ever.  Watch your clocks for 9:26:53 pm, for that shall be the best second you will ever see!

Yeah, in case you haven't figured it out yet, I'm a little bit of a geek.  I like math and numbers and stuff. :)

Anyway, because this year's Pi Day is so epic, I painted my nails to celebrate!  They didn't turn out quite as epic as I'd hoped, but I like them all the same.


I used China Glaze Sunset Sail as the background color, which is the closest I have to pie-crust-tan, and the numbers were done with China Glaze I Brake For Colour.  The letter Pi on my right thumb was done with Sally Hansen Red My Lips and I'm super proud of how neatly it turned out (except for the top coat smears).


I don't even want to show you the rest of my right hand.  I tried some stamping, with a little pie and also some circles, but apparently stamping is really hard and everything turned out wibbly and piece-y and horrible.  I may have thrown a mini tantrum and sworn off stamping forever...

I'm going to be spending the afternoon making apple-cranberry pie, and for dinner I'm making Shepherd's Pie. :D

What are you doing to celebrate Pi Day today?  Do you think I'm a total dork for even caring? ;) Let me know in the comments!